सेरीकल्चर पर इस गाइड से आप जान सकेंगे कि सेरीकल्चर क्या है, शहतूत की खेती कैसे करें, रेशम पालन और उत्पादन। यदि आप इस विषय पर अच्छी जानकारी प्राप्त करने के इच्छुक हैं तो यह लेख निश्चित रूप से आपकी बहुत मदद करने वाला है।
आपको पूरी उत्पादन प्रक्रिया के दौरान शामिल धन के बारे में भी पता चल जाएगा। इसके अलावा, रेशम उत्पादन के लिए ज्ञान और कौशल की आवश्यकता होती है, इसलिए हर कोई सफल नहीं हो सकता है।
इसलिए अंत तक पढ़ते रहें और कोई भी महत्वपूर्ण टॉपिक मिस न करें। मैं इस लेख में जो जानकारी साझा कर रहा हूं, वह क्षेत्रीय रेशम उत्पादन अनुसंधान स्टेशन, कलिम्पोंग, भारत में वर्षों के शोध, परीक्षण और अभ्यास से जुड़ी है।
रेशम उत्पादन के क्षेत्र में उनके योगदान के लिए मैं वैज्ञानिक-डी डॉ. जाकिर हुसैन और वैज्ञानिक-सी डॉ हरीश बाबू को हृदय से धन्यवाद देता हूं।
Table of Contents
रेशम उत्पादन क्या है?
हम सरल शब्दों में परिभाषित कर सकते हैं कि रेशम उत्पादन विज्ञान की एक कला या शाखा है जिसमें कच्चे रेशम के उत्पादन में शामिल सभी गतिविधियों का अध्ययन और अभ्यास शामिल है। इसमें मोरीकल्चर (शहतूत की खेती), रेशम कीट पालन, कोकून उत्पादन और अंत में कच्चा रेशम शामिल हैं।
रेशम उत्पादों की भारी मांग है और इसीलिए 1 किलोग्राम कोकून की कीमत 400 से 750 भारतीय रुपए के बीच भिन्न होती है। हालांकि दुर्लभ प्रकार के रेशम जैसे मुगा के बाजार में बहुत अधिक मूल्य हो सकते हैं। ऐसा इसलिए है क्योंकि मूगा रेशम की खेती केवल भारत के असम क्षेत्र में ही की जा सकती है।
हालांकि, रेशम उत्पादन एक जटिल और तकनीकी प्रक्रिया है, इसलिए इसके लिए ज्ञान और कौशल की आवश्यकता होती है।
रेशम के प्रकार
दुनिया में 4 प्रकार के प्राकृतिक रेशम हैं, और वे हैं शहतूत रेशम, एरी रेशम, तसर रेशम, और मुगा रेशम । और ये सभी 4 प्रकार के रेशम भारत में मौजूद हैं। दुनिया में प्राकृतिक रेशम के कुल उत्पादन का 90% शहतूत रेशम से आता है।
यह मुख्य रूप से शहतूत रेशम के कीड़ों की अनुकूलन क्षमता, आर्थिक दहलीज, जीवन चक्र और भोजन की आदत के कारण है। सभी रेशम के कीड़ों को पालतू नहीं बनाया जा सकता है। यह नीचे दिए गए टॉपिक्स को पढ़ने के बाद और स्पष्ट हो जाएगा।
शहतूत रेशम
यह विश्व में सर्वाधिक उत्पादित रेशम है। जैसा कि आप पहले से ही जानते हैं कि दुनिया में 90% प्राकृतिक रेशम शहतूत रेशम से संबंधित है। लेकिन इस उपलब्धि का श्रेय रेशम का कीड़ा “बॉम्बिक्स मोरी” को जाता है।
यह रेशम का प्राथमिक उत्पादक है और शहतूत के पत्तों पर भोजन करना पसंद करता है। हालाँकि, यह ओसेज ऑरेंज और लेट्यूस के पत्तों पर भी फ़ीड कर सकता है लेकिन फिर उपज कम हो जाती है। यह एकमात्र रेशमकीट भी है जिसे सफलतापूर्वक पालतू बनाया गया है।
शहतूत रेशमकीट वोल्टिनिज़्म के आधार पर यूनिवोल्टाइन, बायवोल्टाइन या मल्टीवोल्टाइनदौड़ के हो सकते हैं। वैश्विक बाजार में इसकी गुणवत्ता के कारण बाइवोल्टाइन रेशम की मांग अधिक है। हालांकि, हर क्षेत्र में द्विवार्षिक जाति को पालतू बनाना संभव नहीं है।
शहतूत रेशमकीट द्वारा उत्पादित कोकून आमतौर पर सफेद रंग के होते हैं और ये बंद सिरे वाले कोकून होते हैं। हालांकि बाइवोल्टाइन और मल्टीवोल्टाइन रेशमकीट के क्रॉस द्वारा उत्पादित कोकून हल्के पीले रंग के होते हैं।
हम इस लेख के बाद के भाग में इन जातियों के बारे में गहराई से चर्चा करेंगे।
एरी सिल्क
एरी रेशम के उत्पादन के लिए जिम्मेदार कीड़ा "फिलोसामिया रिसिनी" है और यह अर्द्ध पालतू रेशम का कीड़ा है। एरी रेशमकीट आमतौर पर जापान, चीन और भारत के उत्तर-पूर्वी हिस्से में पाए जाते हैं। इस रेशमकीट के मेजबान पौधे के कारण "एरी" शब्द का इस्तेमाल किया गया था।
एरी रेशम का कीड़ा अरंडी के पत्तों पर फ़ीड करता है, जिसे एरी रेशमकीट के स्थानीय क्षेत्र, यानी असम (भारत) में "एरी" कहा जाता है। और इसलिए इन कीड़ों को एरी रेशमकीट नाम दिया गया है। हालांकि, शहतूत रेशमकीट के विपरीत, एरी रेशमकीट पॉलीफैगस है।
इसका मतलब है कि यह कुछ वैकल्पिक पौधों पर भी फ़ीड कर सकता है जो टोपिओका, ब्रपत, केसेरू, गुलांचा, गमरी आदि हैं। हालांकि प्राथमिक फ़ीड अरंडी है। एरी रेशम के कीड़े मल्टीवोल्टाइन रेस के होते हैं और उनके द्वारा उत्पादित कोकून ओपन एंडेड कोकून होते हैं।
कोकूनों का रंग सफेद से हल्का सफेद हो सकता है और इसीलिए एरी रेशम को “शांति रेशम” या “अहिंसा रेशम भी कहा जाता है। एरी रेशम के कीड़ों को एंडी या एरंडी के नाम से भी जाना जाता है।
तसर सिल्क
तसर रेशम के उत्पादन के लिए जिम्मेदार कीड़ा "एंथेरिया मायलिट्टा" है, इस रेशम कीड़ा को पालतू नहीं बनाया जा सकता है और यह बाइवोल्टाइन जाति का है। तसर रेशमकीट आसन, साल, ओक और अर्जुन पौधों की पत्तियों को खाता है। एंथेरिया प्रोयिलि मुख्य रूप से ओक के पेड़ के पत्तों पर फ़ीड करता है इसलिए इसे ओक तसर रेशमकीट के रूप में जाना जाता है।
और ओक तसर रेशमकीट द्वारा उत्पादित रेशम को ओक तसर रेशम के रूप में जाना जाता है। उत्पादित रेशम का रंग तांबे जैसा होता है।
मुगा सिल्क
मुगा रेशम के उत्पादन के लिए जिम्मेदार मल्टीवोल्टाइन रेशमकीट "एंथेरिया एसामेंसिस" है। मूगा रेशम का कीड़ा मुख्य रूप से सोम और साल की पत्तियों पर फ़ीड करता है। मुगा रेशम के सुनहरे पीले रंग और गुणवत्ता के कारण, इसका आर्थिक मूल्य अन्य प्रकार के रेशम की तुलना में बहुत अधिक है।
हालाँकि, आज तक मुगा रेशम का उत्पादन केवल असम, भारत में ही किया जा सकता है। इसलिए मुगा रेशम का उत्पादन क्षेत्र विशिष्ट है और इसलिए केवल असम के किसान ही मुगा रेशम के उत्पादन में शामिल हो सकते हैं। इस क्षेत्र के कारण मूगा रेशम को "असम का गौरव" भी कहा जाता है।
इन्हें पढ़ना आपको भी अच्छा लगेगा:
यह भी पढ़ें: कृषि ऋण कैसे प्राप्त करें
यह भी पढ़ें: ऑर्किड खेती गाइड
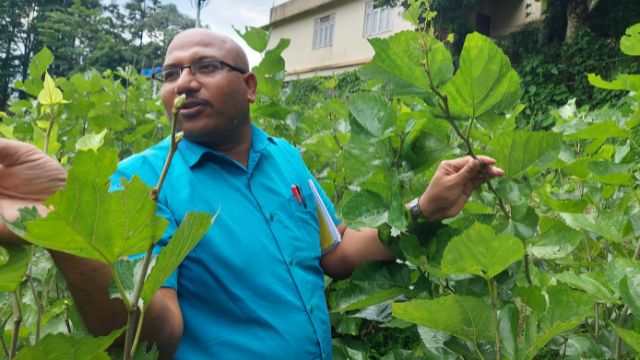
शहतूत की खेती गाइड
यदि आप रेशम उत्पादन में रुचि रखते हैं, तो सबसे पहले आपको मोरीकल्चर, यानी शहतूत की खेती की प्रक्रिया को समझना होगा। क्योंकि रेशमकीट पालन शुरू करने के लिए आपको उनका चारा तैयार करना होगा, यानी शहतूत का पत्ता।
अब आप सोच रहे होंगे कि क्या होगा अगर मैं केवल रेशमकीट पालन का अभ्यास करूं और शहतूत के पत्ते सीधे बाजार से फ़ीड के रूप में प्राप्त करूं?
लेकिन, आर्थिक रूप से यह नुकसान का सौदा है और मैं नहीं चाहता कि आपका खेती का उद्यम कम हो। इसलिए हमेशा सलाह दी जाती है कि रेशमकीट पालन शुरू करने से पहले एक स्थापित शहतूत उद्यान अच्छी तरह से स्थापित कर लें।
शहतूत के बगीचे की आवश्यकता के लिए जिम्मेदार अन्य कारक भी हैं जिनके बारे में आप इस लेख के बाद के भाग में जानेंगे।
रेशम के कीड़ों की तरह, शहतूत की सभी किस्में हर क्षेत्र के लिए उपयुक्त नहीं होती हैं। इसलिए शहतूत के बगीचे का रोपण शुरू करने से पहले ही आपको अपने क्षेत्र के लिए उपयुक्त शहतूत की सर्वोत्तम किस्मों को जानना होगा।
इन कारकों के अलावा, बारानी या सिंचित कृषि पद्धतियों के कारण उर्वरक की मात्रा, सिंचाई की बारंबारता और दूरी भी भिन्न होती है। अन्य पहलू भी हैं जिन्हें आरंभ करने के लिए आपको समझने की आवश्यकता है।
हालांकि, अगर आप इसे सरल रखना चाहते हैं, तो आप शहतूत की खेती शुरू कर सकते हैं। लेकिन आप तीसरे चरण तक रेशमकीट पालन से बच सकते हैं (चॉकी पालन)। इसके बजाय आप सरकारी निकायों या अन्य किसानों से चौकी कीड़े खरीद सकते हैं और फिर प्रक्रिया को कोकून के उत्पादन तक जारी रख सकते हैं।
इसका कारण यह है कि जब तक चौकी पालन, देखभाल और देखभाल के लिए महान कौशल, समय, उपकरण और अनुभव की आवश्यकता होती है। लेकिन देर से उम्र में पालन-पोषण की प्रक्रिया बहुत आसान हो जाती है।
तो चलिए इनके बारे में स्टेप बाय स्टेप जानना शुरू करते हैं।
जलवायु
शहतूत के पेड़ की किस्म के आधार पर जलवायु संबंधी आवश्यकताएं भिन्न हो सकती हैं। हम इसे इसके विपरीत भी कह सकते हैं कि किस्म का चयन स्थानीय जलवायु परिस्थितियों पर निर्भर करता है।
उदाहरण के लिए, BC259, Tr-10, या Tr-23 शहतूत की किस्म पहाड़ी क्षेत्र (कालिम्पोंग) के लिए उपयुक्त हैं। जबकि S1635, S34, S13, या विश्वा किस्में कर्नाटक के अधिक उपयुक्त गर्म शुष्क क्षेत्र के लिए उपयुक्त हैं।
लेकिन आदर्श औसत तापमान सीमा 24 से 28o सेल्सियस के साथ सापेक्ष आर्द्रता लगभग 65 से 80% को अनुकूल माना जाता है। आर्द्रता, तापमान और वर्षा न केवल शहतूत के रोपण की वृद्धि और विकास में बल्कि रेशमकीट के जीवन चक्र में भी प्रमुख भूमिका निभाते हैं।
6 से 12 घंटे धूप प्रति दिनऔर वर्षा 600 मिमी से 2500 मिमी वार्षिक उपयुक्त है। कम वर्षा की स्थिति में फसल की पानी की जरूरतों को पूरा करने के लिए सिंचाई आवश्यक है।
मिट्टी
थोड़ा अम्लीय(6.0-6.8pH), अच्छी तरह से सूखा हुआ, दोमट मिट्टी शहतूत की खेती के लिए आदर्श है। लेकिन आप इनकी खेती रेतीली से चिकनी मिट्टी में भी कर सकते हैं। खारी और क्षारीय मिट्टी में शहतूत की खेती से बचें, क्योंकि वे पौधे की वृद्धि को कम कर सकते हैं।
प्रसार के तरीके
अर्ध-दृढ़ लकड़ी कटिंग जैसी वानस्पतिक प्रसार विधि शहतूत को बड़े पैमाने पर रोपण के लिए प्रचारित करने के सर्वोत्तम तरीकों में से एक है। अच्छी तरह से स्थापित शहतूत उद्यान 8 से 12 महीने पुराने से ही कटिंग लें।
3 से 4 सक्रिय कलियों के साथ 15 से 20 सेंटीमीटर लंबी कटिंग लें। तिरछी 45 डिग्री के कोण पर तेज कटिंग करना सुनिश्चित करें। कटिंग लेते समय छाल को अलग करने से बचें क्योंकि इससे पौधों का खराब विकास हो सकता है।
बेहतर परिणाम के लिए आप बिजली से चलने वाले शहतूत कटर का उपयोग कर सकते हैं। नर्सरी में कटिंग लगाने से पहले नीचे के सिरे को 40 लीटर पानी में 1 किलोग्राम एज़ोस्पिरिलम संस्कृति से 30 मिनट तक उपचारित करें।
नर्सरी प्रबंधन
यदि आप रेशम उत्पादन में लगे किसानों को रोपाई या बेचने के लिए शहतूत के पौधे उगाना चाहते हैं, तो आपको नर्सरी का प्रबंधन करने की आवश्यकता है। एक हेक्टेयर शहतूत के रोपण के लिए, 800 m2 नर्सरी का क्षेत्र पर्याप्त है।
सभी मलबे और खरपतवारों को हटा दें, 1600 किलोग्राम फार्म यार्ड खाद लागू करें, और 4 x 1.5 मीटर आकार की उठी हुई क्यारियां तैयार करें। साथ ही जल निकासी चैनल तैयार करें और नर्सरी के लिए छायादार क्षेत्र से बचें। संक्रमण के जोखिम को कम करने के लिए सीमाओं को जाल से ढकें।
कटिंग प्लांटेशन
बेहतर जड़ और संक्रमण मुक्त पौधों के लिए समय-समय पर निरीक्षण आवश्यक है। कटाई के रोपण से पहले सिंचाई करें और कटाई के बीच 15 x 7 सेंटीमीटर की दूरी का पालन करें। नीचे के सिरे यानी 45 डिग्री पर कटे हुए हिस्से को रोपें।
हर तीन दिन में एक बार सिंचाई करें, और अच्छे परिणाम सुनिश्चित करने के लिए दीमक और कवक रोगों पर नियंत्रण रखें। रोपण के लगभग 90 से 120 दिनों के बाद आपके पौधे रोपाई के लिए तैयार हो जाएंगे।
आप इस पौधे को या तो अपने खेत में रोपण के लिए उपयोग कर सकते हैं या आप उन्हें बाजार में बेच सकते हैं।
शहतूत का रोपण
बरसात का मौसम शहतूत के खेत में पौधे लगाने का सबसे अच्छा मौसम है। अतः पौधरोपण के समय के अनुसार आप नर्सरी में पौधे लगाने की तिथि की योजना बना सकते हैं। कठोर गर्मी और सर्दी के दौरान शहतूत के रोपण से बचें।
वृक्षारोपण के लिए या तो मेड़ और खांचे या गड्ढे प्रणाली का पालन करें। आप अच्छी जड़ वाले शहतूत के पौधे लगभग 1 फीट की गहराई पर लगा सकते हैं।
रिक्ति उत्पादकता, संक्रमण आदि में महत्वपूर्ण भूमिका निभाती है। इसलिए आपको अपने क्षेत्र के लिए इष्टतम पत्ती उपज प्राप्त करने के लिए हमेशा अनुशंसित अंतराल का पालन करना चाहिए। यदि आप एक एकड़ में 3×3 फीट की दूरी का पालन करते हैं तो आप लगभग 4,938 शहतूत के पौधे लगा सकते हैं।
यदि आप खेत से अतिरिक्त आय प्राप्त करना चाहते हैं तो आप अंतर-फसल की योजना भी बना सकते हैं। हालांकि, अगर आप इंटरक्रॉपिंग को शामिल करना चाहते हैं तो आपको वृक्षारोपण को गहराई से समझना चाहिए।
पत्तों की किफायती उपज के लिए पहाड़ियों में शहतूत उद्यान की स्थापना में लगभग 8 से 12 महीने का समय लगेगा। लेकिन मैदानी इलाकों में लगभग 6 महीने ही लगते हैं।
पत्तियों के परिपक्वता समय के आधार पर आपको रेशमकीट पालन की योजना बनानी चाहिए, अन्यथा आप अपना समय और पैसा बर्बाद कर देंगे।
खाद
जैविक या अकार्बनिक उर्वरक लगाना आप पर निर्भर करता है, लेकिन आपको पौधों की उर्वरक आवश्यकताओं को पूरा करने की आवश्यकता है। सिंचित खेती के मामले में, 300 किलोग्राम नाइट्रोजन, और 120 किलोग्राम फास्फोरस और पोटेशियम की 6 विभाजित खुराकों में आवश्यकता होती है।
रोपण के तीन महीने बाद आप पहली खुराक लगा सकते हैं। और पहली खुराक के बाद, अगली खुराक हर पत्ते की कटाई और छंटाई के बाद लगाएं।
लेकिन बारिश पर निर्भर खेती की स्थिति के लिए, 100 किलोग्राम नाइट्रोजन और 50 किलोग्राम फॉस्फोरस और पोटेशियम की 2 विभाजित खुराक की आवश्यकता होती है।
आप समग्र उपज बढ़ाने के लिए जैविक खाद के साथ जैव उर्वरक जैसे जीवामृत, पंचगव्य आदि का भी उपयोग कर सकते हैं। सूक्ष्म पोषक तत्वों की कमी के लक्षणों के मामले में भी आवश्यक सूक्ष्म पोषक तत्व जैसे 5 ग्राम जिंक सल्फेट, 2.5 ग्राम बोरेक्स, 2.5 ग्राम मैंगनीज आदि का प्रयोग करें।
सिंचाई
सिंचित प्रणाली के मामले में, रिज और फरो विधि को सबसे कुशल माना जाता है। बेहतर उत्पादन के लिए आप ड्रिप इरिगेशन विधि भी अपना सकते हैं।
सिंचाई की आवृत्ति स्थानीय पर्यावरण के अनुसार बदलती रहती है, उच्च वर्षा वाले क्षेत्र में सिंचाई की आवृत्ति कम होगी।
इंटरकल्चरल ऑपरेशंस
शहतूत के बगीचे में अंतर-संस्कृति संचालन जैसे निराई, छंटाई, मल्चिंग, महत्वपूर्ण गतिविधियाँ हैं। घास के खरपतवार जैसे बरमूडा घास, अखरोट घास, और चौड़ी पत्तियां जैसे ट्रिडैक्स, पिगवीड, हॉग वीड, गाजर घास, आदि समग्र उत्पादन को कम कर सकते हैं।
निराई
आप सांस्कृतिक तरीकों का पालन कर सकते हैं जैसे कि खेत की तैयारी के समय खरपतवार निकालना, औजारों की सफाई और खरपतवारों के विकास को रोकने के लिए खरपतवार मुक्त खाद का उपयोग करना।
रोपण के बाद आप यांत्रिक खरपतवार नियंत्रण विधियों को अपना सकते हैं। हाथ की कुदाल से खर-पतवार हटाने जैसे कार्यों से खरपतवारों को नियंत्रित करने में मदद मिलती है। लेकिन फिर भी यदि आप खरपतवारों की जोरदार वृद्धि देखते हैं तो आप रासायनिक नियंत्रण विधियों को अपना सकते हैं।
खरपतवारों के उभरने के बाद उन्हें नियंत्रित करने के लिए आप पैराक्वेट @2 से 3 लीटर प्रति हेक्टेयर का उपयोग कर सकते हैं।
मल्चिंग
इसकी कई भूमिकाएँ हैं। मल्चिंग आपको खरपतवार की वृद्धि को नियंत्रित करने, मिट्टी की नमी को कम करने, मिट्टी की नमी को संरक्षित करने, सिंचाई की आवश्यकता को कम करने आदि में मदद करेगी। आप मल्चिंग के लिए पुआल, सूखे पत्तों आदि का उपयोग कर सकते हैं।
छंटाई
साल में एक बार आपको नीचे की छंटाई का अभ्यास करना चाहिए। इस विधि में पौधे को जमीनी स्तर पर 10 से 25 सेंटीमीटर स्टंप को जमीनी स्तर से ऊपर छोड़ कर काट लें।
नीचे की छंटाई के साथ, आपको मध्य प्रूनिंग भी करना चाहिए। इस विधि में शाखाओं को जमीनी स्तर से 40 से 60 सेंटीमीटर ऊपर काट लें।
बारीकी से लगाए गए क्षेत्र में कोलार छंटाई का अभ्यास करें। इस विधि में कटाई के बाद हर बार जमीनी स्तर पर शाखाओं को काटें। तो इस तरीके को अपनाकर आप साल में 5 बार तक छंटाई करेंगे।
कीट और रोग
किसी भी अन्य पौधे की तरह, शहतूत भी कीट और बीमारियों से ग्रस्त है। ये तालिकाएँ आपको उन्हें कुशलतापूर्वक पहचानने और नियंत्रित करने में मदद करेंगी।
कीट
| कीट | लक्षण | प्रबंधन |
|---|---|---|
| लीफ वेबर (डायफेनिया पुलवेरुलेंटलिस) | Makes silken web among the apical leaves. Feed by scraping the tissue. Rolls up the tender leaves. Feed on whole leaf leaving the midrib and veins. | 10 दिनों में एक बार 0.2% डीडीवीपी (नुवन) लागू करें। रिलीज़ पुपल पैरासिटॉइड टेट्रास्टिकस हॉवर्डी @1,25,000 वयस्क/हेक्टेयर और ट्राइकोग्रामा चिलोनिस @ 3 ट्राइकोकार्ड/सप्ताह/हेक्टेयर। |
| मीली बग (मैकोनेलिकोकस हिर्सुटस) | Affected plants show curling of leaves at the growing point. Leaf area decreases due to crinkling. Malformation of apical shoot producing multiple shoots. | छंटाई के 15-20 दिन बाद 0.2% डीडीवीपी @ लागू करें। रिलीज़ क्रिप्टोलैमस मोंट्रोज़िएरी @300 बीटल/एसी। |
| पपीता मीली बग (पैराकोकस मार्जिनैटस) | Malformation of affected portion. Stunted growth. Yellowing of leaves. Sooty mould on leaves. | 10 दिनों में एक बार 0.2% डीडीवीपी (नुवान) का छिड़काव करें। एसरोफैगस पपायी @250-300 वयस्क प्रति एकड़ रिलीज करें। |
| थ्रिप्स (स्यूडोडेन्ड्रोथ्रिप्स मोरी) | Formation of white streaks in early stage followed by silvery blotches. Severe infestation – retarded growth, malformation. | नुवन (0.02%), या रोगर (0.1%) (8-10 दिनों की सुरक्षित अवधि) का छिड़काव करें। |
रोग
| रोग | लक्षण | प्रबंधन |
|---|---|---|
| Powdery mildew (Phyllactinia corylea) | White powdery patches on the lower surface of the leaves. Corresponding portions on the upper surface develop chlorotic lesions. White powdery patches turn to brownish-grey, black, yellowish and leathery. | Spray 0.1% Carbendazim 50% WP (Bavistin) (2 g/lit. water), or 0.2% Sulphur 80WP(Sulfex) (2.5 g/ litre). |
| Leaf rust (Cerotelium fici) | Pin head shaped brown to black pustules on the lower side. Yellowing of leaves and premature defoliation. | Apply 0.2% Copper Oxychloride 50WP (Blitox) (4 g/litre). |
| Leaf spot (Cercospora moricola) | Initially brownish necrotic irregular spots appear. Spots enlarge & join together. Leaves turn yellow and wither-off. | Spray 0.1% Carbendazim 50% WP (Bavistin) (2 g/litre). |
| Root rot (Macrophomina phaseolina) | Sudden withering of leaves. Plants fail to sprout after pruning and dry up completely (wilting). Affected plants can be pulled out easily. Rotting of root. Rotten roots turn black and roots contain large number of black scleroti. Decay of root bar. | Uprooting and burning. Application of Neem cake @ 1 ton/ha in four split doses. Application of Trichoderma viride @25 g/plant. Drenching the soil with carbendazim @ 250 ml of 1% concentration per plant. |
टिप्स: यदि संभव हो तो नियमित रूप से शहतूत के बगीचे की जांच करते रहें। किसी भी प्रकार का संक्रमण होने पर तुरंत प्रभावित हिस्से को हटा दें और मुख्य खेत से दूर फेंक दें या जला दें।
फसल की कटाई
शहतूत की खेती में कटाई बहुत महत्वपूर्ण कदम है। अच्छी गुणवत्ता वाले पत्ते सुनिश्चित करने के लिए आपको केवल सुबह के समय ही कटाई करनी चाहिए। बारिश के तुरंत बाद पत्तियों की कटाई से बचें। आप इन तीन विधियों में से किसी एक से कटाई कर सकते हैं।
पत्तों की तुड़ाई, शाखाओं की कटाई और पूरी टहनी की कटाई। आप नीचे दिए गए पालन अनुभाग में शहतूत के पत्तों की कटाई के बारे में अधिक समझेंगे। वह भाग आपको यह समझने में मदद करेगा कि आपको कौन सी पत्तियों की कटाई करनी है और किस अवस्था में।
रेशमकीट पालन
रेशम के कीड़ों को पालना अपने आप में एक कौशल और एक कला है जिसे सफल होने के लिए किसानों को उत्कृष्टता प्राप्त करने की आवश्यकता है। रेशमकीट पालन को समझने से पहले आपको पालन गृह के बारे में जानना होगा।
रेशम के कीड़ों को तापमान, आर्द्रता, धूप, कीट और बीमारियों का खतरा होता है। इसलिए आपको उन्हें पालन-पोषण गृह में इष्टतम वातावरण प्रदान करने की आवश्यकता होगी। पालन-पोषण गृह के साथ-साथ आपको पालन-पोषण के उपकरणों से भी परिचित होने की आवश्यकता है।
पालन-पोषण गृह
ऐसे स्थान का चयन करें जो जलभराव की स्थिति से दूर हो। उच्च वर्षा वाले क्षेत्र के लिए, सूखी, धूप वाली, अच्छी तरह हवादार और सूखा हुआ भूमि चुनें। लेकिन कम वर्षा वाले क्षेत्र के लिए ठंडी और नम भूमि चुनें। लेकिन ऐसे क्षेत्र में पालन गृह का निर्माण करने से बचें जहां दिन भर तेज धूप रहती हो।
आप थैच्ड, असबस्टार रूफ, आरसीसी रूफ, या टाइल रूफ्ड रीयरिंग हाउस का निर्माण कर सकते हैं। अगर आपको लगता है कि यह काफी जटिल और महंगी प्रक्रिया है तो आपको भारत सरकार द्वारा दी जाने वाली सब्सिडी के बारे में जानकर हैरानी होगी।
इस लेख के अंत में मैं सब्सिडी के बारे में विस्तार से चर्चा करूंगा। इसके अलावा, यदि आप पालन-पोषण गृह के बारे में गहराई से जानने के इच्छुक हैं, तो हमसे फेसबुक या इंस्टाग्राम पर हमसे संपर्क करें।
एक बार जब आप पालन गृह का निर्माण कर लेते हैं तो आपको पालन-पोषण के उपकरणों से परिचित होने की आवश्यकता होती है। इनके बिना आप रेशमकीट पालन नहीं कर सकते।
रेशमकीट पालन उपकरण
आपको अपने रेशमकीट पालन घर में पालन स्टैंड, पालन ट्रे, चींटी के कुएं, पैराफिन पेपर, फोम रबर स्ट्रिप्स, चॉपस्टिक, पंख, स्प्रेयर, ह्यूमिडिफायर, थर्मो-हाइग्रोमीटर, फ्रिज आदि की आवश्यकता होगी। बेहतर जानकारी प्राप्त करने के लिए हम एक-एक करके उनके बारे में जानेंगे।
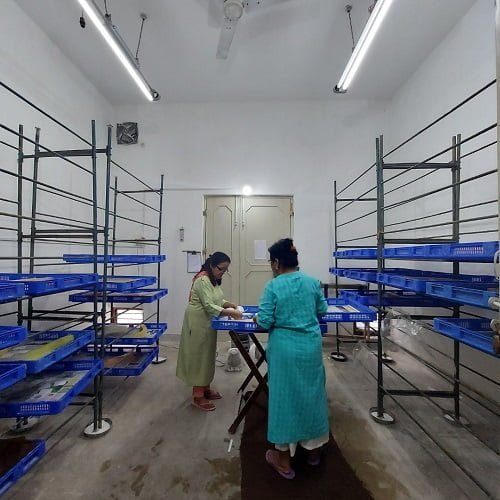
पालन स्टैंड
वे फ्रेम होते हैं जिनमें आपको रेशम के कीड़ों से युक्त पालन ट्रे रखना होता है। फ्रेम की सामग्री लकड़ी, बांस या लोहे की हो सकती है। हालांकि, कम लागत और आसान संचालन के कारण बहुत से किसान बांस से बने पालन स्टैंड का उपयोग कर रहे हैं।
2.25 मीटर ऊंचाई, 1.5 मीटर लंबाई, और 0.65 मीटर चौड़ाई पालन स्टैंड के फ्रेम के लिए आदर्श हैं। प्रत्येक स्टैंड में 10 से 12 टीयर होने चाहिए प्रत्येक दो स्तरों के बीच 0.15 मीटर।
आपके पालन-पोषण घर के एक कमरे में आप ऐसे छह स्टैंड रख सकते हैं।
चींटी वेल्स
चींटियाँ रेशम के कीड़ों को पालने में गंभीर समस्या पैदा कर सकती हैं, इसलिए हमें रेशम के कीड़ों के आसपास उपस्थिति से बचना चाहिए। इसलिए पालने वाले स्टैंड का एक-एक पैर चींटी के कुएं पर टिका होना चाहिए। आप चींटी के कुएं के रूप में 20 सेंटीमीटर चौड़ी और 4 से 5 सेंटीमीटर गहरी तामचीनी प्लेट ले सकते हैं।
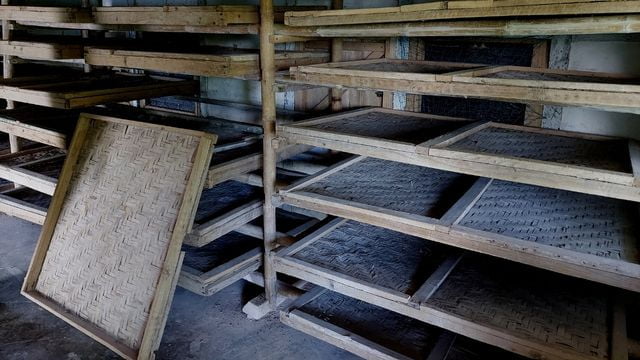
रियरिंग ट्रे
वे पोर्टेबल हैं और पालन के दौरान रेशमकीट के प्रबंधन में मदद करते हैं। और कई प्रकार के पालन ट्रे उपलब्ध हैं जो सामग्री, आकार और लंबाई में एक दूसरे से भिन्न होते हैं। सबसे आम पालन ट्रे 1.2 मीटर 0.9 मीटर 12 सेंटीमीटर के आयाम वाले बक्से या ट्रे हैं।
100 रोग मुक्त बिछाने (डीएफएलएस ) को दूसरे इंस्टार तक बढ़ने के लिए ऐसी दो ट्रे की आवश्यकता होती है। आप इस लेख के बाद के भाग में पालन भाग में डीएफएलएस के साथ-साथ इंस्टार को भी समझेंगे।
पैराफिन पेपर
यह एक मोटा क्राफ्ट पेपर है पैराफिन मोम के साथ लेपित जिसका गलनांक 55o सेल्सियस होता है। ट्रे में पालन के दौरान, आप रेशम के कीड़ों को ढकने के लिए पैराफिन पेपर का उपयोग कर सकते हैं। यह पत्तियों को मुरझाने से रोकने और पालन बिस्तर में आवश्यक नमी बनाए रखने में मदद करता है।
फोम रबर स्ट्रिप्स
पानी में डूबी 2.5×2.5 सेंटीमीटर मोटी की लंबी फोम रबर स्ट्रिप्स पालन ट्रे में नमी बनाए रखने के लिए उपयोगी होती हैं। आम तौर पर आपको उन्हें पहले दो चरणों के दौरान रेशमकीट पालन बिस्तरों के आसपास रखने की आवश्यकता होती है।
चॉपस्टिक
युवा आयु वर्ग के लार्वा नाजुक होते हैं और उन्हें सीधे हाथों से नहीं छूना चाहिए। इसलिए, युवा आयु वर्ग के लार्वा को चुनने के लिए बांस से बने चॉपस्टिक का उपयोग किया जा सकता है।
पंख
पालन-पोषण ट्रे में नव जन्मे रेशमकीटों को ब्रश करने के लिए पक्षियों के पंख आवश्यक हैं। ब्रश करने के लिए पंखों का उपयोग करने से मानव स्पर्श के कारण किसी भी प्रकार के संक्रमण या क्षति से बचने में मदद मिलती है।
सफाई के जाल
वे बिस्तर की सफ़ाई प्रथाओं को पूरा करने के लिए आवश्यक हैं। विकास के प्रत्येक चरण में, समय-समय पर पत्तियों के बचे हुए हिस्से और रेशमकीट के कूड़े को सफाई जाल की मदद से हटा देना चाहिए। यह पालन ट्रे के अंदर स्वच्छता बनाए रखने में मदद करता है।
फीडिंग स्टैंड
वे लकड़ी के छोटे उपकरण हैं जिनके क्रॉस-लेग लगभग 0.95 मीटर ऊंचे हैं। भोजन और सफाई के लिए पालन ट्रे रखने के लिए फीडिंग स्टैंड आवश्यक हैं।
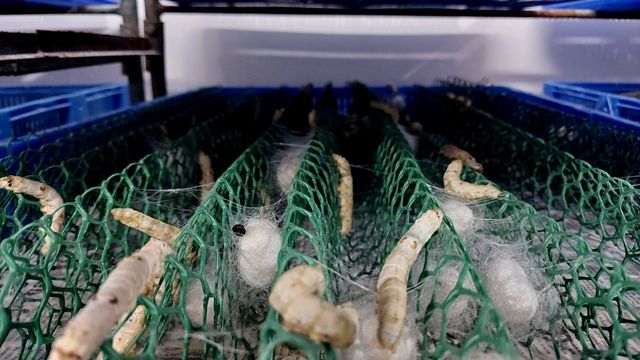
माउंट
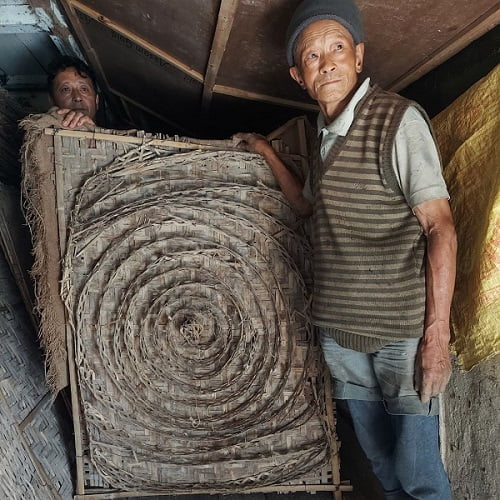
इनका उपयोग पके हुए कीड़ों को कोकून बनाने के लिए पर्याप्त स्थान प्रदान करने के लिए किया जाता है। "बांस चंद्रिके" भारत में किसानों द्वारा उपयोग किया जाने वाला सबसे आम प्रकार है। बांस चंद्राइक में आयताकार चटाई होती है जिस पर बांस के टेप का एक चक्र लगा होता है।
हालाँकि अन्य प्रकार के माउंटेज भी हैं, और चयन किसानों पर निर्भर करता है। चंद्राइक माउंटेज लागत प्रभावी, आसानी से उपलब्ध, संभालने में आसान और लंबी अवधि तक इस्तेमाल किया जा सकता है।
लेकिन अन्य प्रकार के माउंटेज जैसे रोटरी, प्लास्टिक, बोतल ब्रश, प्लास्टिक बोतल ब्रश, बांस पट्टी माउंटेज आदि भी उपयोगी होते हैं। अन्य आवश्यक उपकरण भी हैं, जैसे चॉपिंग बोर्ड, चाकू, चटाई आदि।
एक बार जब आप उपकरणों से परिचित हो जाएं तो आइए रेशमकीट पालन को समझना शुरू करें। लेकिन पालन शुरू करने से पहले आपको कीटाणुनाशक के बारे में भी जानना होगा। हालाँकि, आपके लिए इसे आसान बनाने के लिए मैं पालन-पोषण के बाद कीटाणुनाशकों के बारे में चर्चा करूँगा।
कीटाणुशोधन
रेशमकीट कई बीमारियों के प्रति संवेदनशील होते हैं: बैक्टीरिया, कवक और परजीवी रेशमकीट पर आसानी से हमला करते हैं। एक बार जब वे बाहर निकल आते हैं, तो बीमारी तेजी से फैलती है। इन बीमारियों की घटनाओं को रोकने के लिए, स्वच्छता बनाए रखना और स्वच्छता तकनीकों को अपनाना आवश्यक है।
पालन-पोषण कक्ष और उपकरणों को अच्छी तरह से साफ किया जाना चाहिए। पालन-पोषण घर और पहनने वाले उपकरणों पर पाए जाने वाली धूल, गंदगी और कूड़ा-कचरा तथा मृत लार्वा को हटा देना चाहिए और पानी से अच्छी तरह धोना चाहिए।
सबसे पहले, सभी पालन-पोषण उपकरणों को कमरे के अंदर रखा जाना चाहिए और स्प्रे मशीन की सहायता से सैनिटेक घोल या 5% ब्लीचिंग पाउडर घोल से कीटाणुरहित किया जाना चाहिए। पालन-पोषण कक्षों की दीवारों, छत और छत के अलावा पालन-पोषण के सभी उपकरणों पर छिड़काव किया जाना चाहिए।
छिड़काव के तुरंत बाद कमरे को 15 से 20 घंटे के लिए बंद कर दिया जाता है. बाद में, दरवाजे और खिड़कियां खोल दी जाती हैं और क्लोरीन गैस के निशान गायब होने के लिए कमरे को लगभग 24 घंटे तक खुला रखा जाता है।
सामान्य कीटाणुशोधन करने का उचित समय रेशमकीट के अंडों से निकलने से दो से तीन दिन पहले है।
वर्तमान में पालन-पोषण कक्ष के उपकरणों को कीटाणुरहित करने के लिए कुछ प्रकार के रसायन उपलब्ध हैं।
40% ताकत वाला फॉर्मेल्डिहाइड सॉल्यूशन वर्तमान में व्यावसायिक उपयोग के लिए प्रतिबंधित है। केवल रेशमकीट के अंडे धोने के लिए अनुशंसित। कीटाणुशोधन उद्देश्य के लिए सैनिटेक सॉल्यूशन की सिफारिश की जाती है। निर्मूल सीएसआर एंड टीआई बेरहामपुर द्वारा विकसित एक नया कक्ष कीटाणुनाशक है और प्रायोगिक परीक्षण के अधीन है।
सैनिटेक का उपयोग कैसे करें?
- 50 ग्राम डालकर सक्रियण शुरू किया जाता है। एक साफ कंटेनर में सेनिटेक के प्रत्येक 500 मिलीलीटर के लिए एक्टिवेटर।
- तैयारी को 5 मिनट के लिए छोड़ दें ताकि क्रिस्टल पूरी तरह से घुल जाएं जब तक कि उनका रंग पीला न हो जाए।
- इस पीले रंग के 500 मिलीलीटर सैनिटेक घोल को 19 लीटर पानी में पतला करना चाहिए।
- एक अन्य साफ बर्तन में 100 ग्राम चूना 500 मिलीलीटर पानी में घोलें।
- यह 500 मि.ली. जैसा कि ऊपर बताया गया है, 19.5 लीटर तैयार घोल में चूने का पानी मिलाना चाहिए।
- इस घोल का उपयोग रेशमकीट पालन गृह और उपकरणों को कीटाणुरहित करने के लिए किया जाना चाहिए।
उपयोग के चरण
- रेशमकीट पालन गृह को कीटाणुरहित करने के लिए फर्श क्षेत्र के प्रत्येक वर्ग मीटर के लिए 2 लीटर की दर से इसका उपयोग किया जाना चाहिए।
- रेशमकीट पालन उपकरणों को 400 मिलीलीटर की दर से व्यवस्थित रूप से तैयार घोल से कीटाणुरहित किया जाना चाहिए। प्रत्येक वर्ग मीटर के लिए।
- (25 मिली. सैनिटेक +5 ग्राम बुझा हुआ चूना) मिलाकर तैयार किए गए घोल का उपयोग रेशमकीट के अंडों की सतह को कीटाणुरहित करने के लिए किया जा सकता है, क्योंकि यह अन्य कीटाणुशोधन की तुलना में बहुत प्रभावी है।
- उसी घोल का उपयोग हाथ धोने (पालन कक्ष में प्रवेश करने से पहले और बाहर निकलने के बाद), पैर और पालने वाले घरों की सफाई के लिए भी किया जा सकता है।
अनुशंसित बिस्तर कीटाणुनाशक
1. लेबेक्स
2. सेरीसिलिन
3.विजेता
4. अंकुश
5 सेरिविन (प्रायोगिक/परीक्षण के तहत)।
सामान्यतः प्रत्येक निर्मोचन के बाद रेशमकीट के बिस्तर पर मलमल के कपड़े या छलनी की सहायता से चूना पाउडर छिड़क कर सादा चूना पाउडर लगाना चाहिए। निर्मोचन के बाद, पहली खुराक देने से ठीक आधे घंटे पहले बिस्तर के ऊपर कोई कीटाणुनाशक लगाना चाहिए।
रेशम के कीड़ों का पालन
पहाड़ी क्षेत्रों में आप साल में 2 से 3 बार पालन का अभ्यास कर सकते हैं, लेकिन मैदानी क्षेत्रों में आप 6 बार तक पालन का अभ्यास कर सकते हैं। 1 डीएफएल (500 अंडे) के पालन के लिए 12 से 14 किलोग्राम शहतूत की पत्तियों की आवश्यकता होती है। हालाँकि किसानों के बीच एक आम मिथक है।
यानि अगर वे अधिक पत्ता खिलाएंगे तो उत्पादन बढ़ेगा। लेकिन ये बिल्कुल विपरीत है. अच्छे उत्पादन के लिए आपको इष्टतम रेंज में पत्ती उपलब्ध करानी होगी। इष्टतम सीमा से अधिक पत्ती आहार बढ़ाने या घटाने से कोकून का उत्पादन कम होगा।
एक एकड़ शहतूत के बगीचे से आप 250 से 300 डीएफएलएस रेशम के कीड़ों को खिला सकते हैं।
पालन शुरू करने से पहले, आपको पालन कक्ष और उपकरणों को कीटाणुरहित करना होगा। रेशम के कीड़ों को कीटों और बीमारियों से बचाने के लिए यह आवश्यक है। तो आइए रेशम के कीड़ों के पालन को समझना शुरू करें।
रेशमकीटों के पालन को 10 चरणों में विभाजित किया जा सकता है जो ऊष्मायन से शुरू होता है और कोकून की कटाई पर समाप्त होता है।
इन्क्यूबेशन
शहतूत रेशमकीट प्रकृति में बाइवोल्टाइन या मल्टीवोल्टाइन हो सकते हैं। बाइवोल्टाइन रेशमकीट के अंडे छह महीने के लिए डायपॉज में रहते हैं। इसलिए उन्हें अंडे सेने के लिए डायपॉज को तोड़ने के लिए एचसीएल उपचार की आवश्यकता होती है। लेकिन एचसीएल एसिड से उपचार करने से पहले आपको अंडे की शीट/कॉर्ड को 2% फॉर्मेलिन घोल में डुबाना होगा।
इससे अंडों को कीटाणुरहित करने में मदद मिलेगी और साथ ही एसिड से उपचार के दौरान अंडे अंडों की शीट पर मजबूती से चिपक जाएंगे। अंडे की शीट को एसिड में उपचारित करने से पहले सूखने के लिए छोड़ दें।
एसिड उपचार
एचसीएल उपचार दो प्रकार के होते हैं, वे गर्म और ठंडे एसिड उपचार हैं। इस तालिका से प्रक्रिया स्पष्ट हो जायेगी।
| पैरामीटर | गर्म एसिड उपचार | शीत अम्ल उपचार |
|---|---|---|
| Age of egg | 20 to 24 hours | 15 to 20 hours |
| Specific Gravity | 1.075 at 15o सेल्सीयस | 1.10 at 10o सेल्सीयस |
| Temperature of acid solution | 46o सेल्सीयस | 25o सेल्सीयस |
| Duration | 5 minutes | 60 to 90 minutes |
एसिड उपचार के तुरंत बाद अंडे की शीट को बहते पानी से धो लें। सुनिश्चित करें कि शीट पर एसिड का कोई निशान न रहे। यह अभ्यास आवश्यक है क्योंकि एसिड के अंश अंडे सेने को प्रभावित कर सकते हैं।
एसिड ट्रीटमेंट के 10 दिन बाद अंडे फूटने लगेंगे।
अंडा संरक्षण
अगर आप किसी खास कारण से एसिड ट्रीटमेंट को टालना चाहते हैं तो आप कोल्ड स्टोरेज के जरिए भी ऐसा कर सकते हैं। ओविपोजिशन के 20 घंटे पहले, अंडों को 5o सेल्सियस और 70-80% सापेक्ष आर्द्रता पर 5 दिनों तक फ्रीज में रखें।
फिर एसिड उपचार से पहले तापमान को 1 से 2 घंटे के लिए 15o और फिर 25o सेल्सियस तक बढ़ाएं।
लेकिन अगर आपने पहले ही बाइवोल्टाइन अंडों को एसिड से उपचारित कर लिया है तो आप उपचार के बाद उन्हें दूसरे से तीसरे दिन तक स्टोर कर सकते हैं। अंडों को 5o सेल्सियस और 70-80% सापेक्ष आर्द्रता पर अधिकतम 20 दिनों तक रखें।
इस मामले में आपको अंडों को संरक्षण से पहले और बाद में 2 से 3 घंटे तक 15o सेल्सियस पर रखना होगा। हम एक ही समय में अंडे सेने को सिंक्रनाइज़ करने के लिए अंडा संरक्षण का अभ्यास करते हैं। समय बचाने और कार्यकुशलता बढ़ाने के लिए यह जरूरी है।
ब्लैक बॉक्सिंग
एक बार जब आप अंडे सेने के लिए तैयार हो जाएं, तो उन्हें पालन कक्ष में 25o सेल्सियस पर 70 से 80% सापेक्ष आर्द्रता पर रखें। एक बार जब पिन हेड की शुरुआत शुरू हो जाती है तो आपको अंडों के पूरी तरह से नीले रंग में बदलने तक इंतजार करना होगा।
यदि सभी अंडे की शीट एक साथ रंग नहीं बदल रही हैं, तो अंडे सेने के लिए तैयार अंडे की शीट को 5o सेल्सियस पर फ्रिज में रखें। एक बार जब सभी अंडे तैयार हो जाएं तो आपको ब्लैक बॉक्सिंग का अभ्यास करना होगा।
आपको काले रंग का कपड़ा लेना है और उसे पानी में डुबाना है. कपड़ा बाहर निकालें और पानी निचोड़ लें। अंडे वाली ट्रे को काले कपड़े से पूरी तरह ढक दें और कमरे की सभी लाइटें बंद कर दें।
48 घंटों के बाद तुरंत लाइटें जला दें और काला कपड़ा हटा दें और अंडों को रोशनी में रख दें। इससे अंडे सेने की शुरुआत हो जाएगी. नए निकले अंडे संरचना में छोटी चींटियों की तरह दिखते हैं।
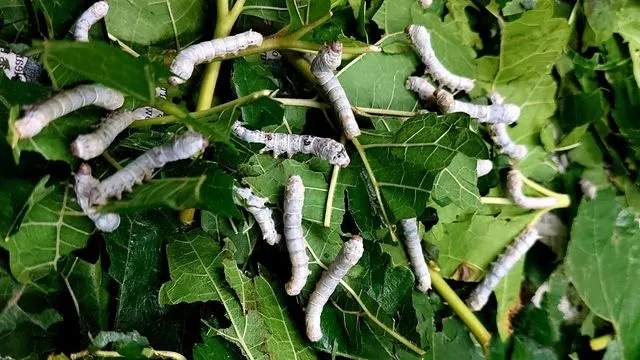
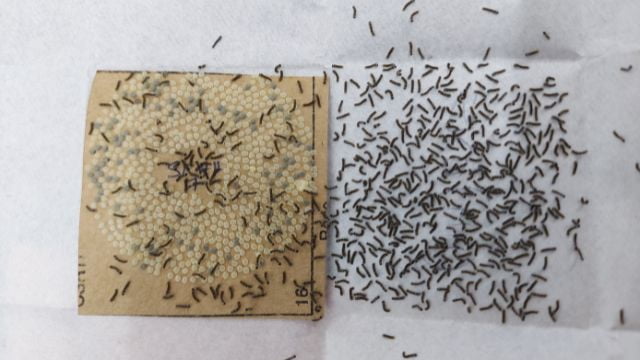
ब्रश करना
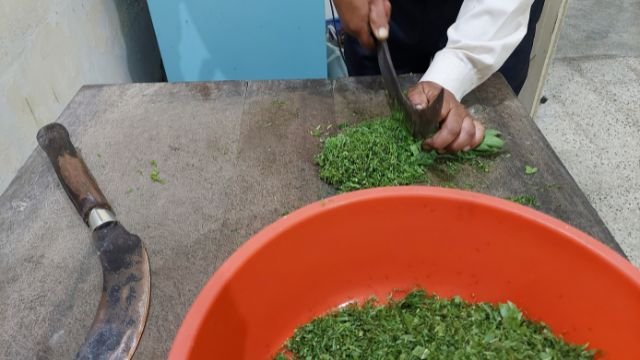
ब्रश करने से पहले आपको रेशमकीट का चारा तैयार करना होगा। अब आपको इस बात का ध्यान रखना होगा कि शुरुआती दौर में आप परिपक्व शहतूत की पत्तियां नहीं खिला सकते। शहतूत के पौधे की ऊपर से छठी तक की तीसरी या चौथी पत्तियों को तोड़ लें और इसे 0.5 वर्ग सेमी तक काट लें। काटने वाले चाकू की सहायता से आकार दें।
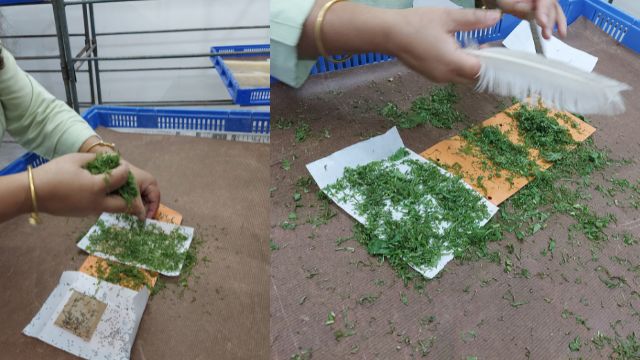
अंडे की शीट पर मुट्ठी भर कटी हुई पत्तियां छिड़कें और फिर पंखों की मदद से अंडे की शीट से कीड़ों को सावधानी से हटा दें। ब्रश करने के बाद उस क्षेत्र को दोनों तरफ फोम रबर स्ट्रिप्स से ढक दें। फिर अंत में पालन-पोषण ट्रे को ऊपरी और निचले सिरे से पैराफिन पेपर से ढक दें।
इससे पालन-पोषण ट्रे में पर्याप्त नमी बनाए रखने में मदद मिलेगी।
चौकी पालन
कम उम्र में रेशमकीट पालन या चौकी पालन दूसरे चरण में समाप्त हो जाता है। पालन-पोषण प्रक्रिया के दौरान कुल पाँच इंस्टार और चार मोल्ट होते हैं। पहले इंस्टार के बाद प्रत्येक इंस्टार से पहले रेशमकीट निर्मोचन के अधीन हो जाएगा। इस संक्रमण अवस्था के दौरान उन्हें विशेष देखभाल की आवश्यकता होती है।
आपको निर्मोचन से पहले और बाद में बिस्तर की सफाई का अभ्यास करना होगा। निर्मोचन के दौरान कीड़े भोजन करना बंद कर देंगे और अपना सिर ऊपर उठा लेंगे। पहला इंस्टार 3 से 4 दिनों तक चलता है। इसलिए पहली बार मॉलिंग शुरू करने से एक दिन पहले आपको बिस्तर की सफाई का अभ्यास करना होगा।
मॉलिंग के दौरान शीर्ष पैराफिन कवर को हटा दें।
बिस्तर की सफ़ाई
0.5×0.5 सेंटीमीटर जाली आकार के जाल का उपयोग करें। इस जाल को पालने वाले बिस्तर पर फैलाएं और चारा दें। कीड़े इन ताज़ी पत्तियों तक रेंग कर आएँगे। एक बार जब वे सफलतापूर्वक ऊपर आ जाएं तो उन्हें दूसरी ट्रे में स्थानांतरित कर दें।
ट्रे में बचा हुआ सारा खाना फेंक दें और फिर आप कीड़ों को फिर से पालन ट्रे में स्थानांतरित कर सकते हैं। एक बार जब कीड़े गलना शुरू कर दें तो खिलाना बंद कर दें और प्रति मीटर2 30 से 50 ग्राम चूना छिड़कें। मोल्टिंग के दौरान कीड़ों को परेशान न करें।
दूसरा इंस्टार 2 से 3 दिनों तक चलता है और सभी इंस्टार में सबसे कम अवधि का होता है।

आपको कीड़े के दोबारा भोजन शुरू करने के बाद और चॉकी पालन के लिए दूसरी बार निर्मोचन से पहले बिस्तर की सफाई का अभ्यास करना होगा। एक बार जब कीड़े निर्मोचन से बाहर आ जाते हैं तो आप कीड़ों को बीमारियों से सुरक्षित रखने के लिए लेबेक्स जैसे कीटाणुनाशक का भी उपयोग कर सकते हैं।
देर से उम्र में पालन-पोषण
तीसरे, चौथे और पांचवें इंस्टार लार्वा देर से आने वाले कीड़े हैं। अगर आप किसान हैं और तमाम झंझटों से बचना चाहते हैं तो इसी चरण से पालन शुरू कर सकते हैं. इसके अलावा आप इस चरण से पत्ती तोड़ने के बजाय प्ररोह पालन का अभ्यास कर सकते हैं।
यानी आप जमीनी स्तर से 1 मीटर की ऊंचाई पर काटे गए शूट की कटाई कर सकते हैं और उन्हें कीड़ों तक खिला सकते हैं। पालन-पोषण की यह विधि आसान है और इससे समय और धन की बचत होगी। लेकिन आप इसका अभ्यास केवल देर से पालन-पोषण के दौरान ही कर सकते हैं।
शूट पालन के लिए, 50 डीएफएल पालने के लिए 1.2×11 मीटर आकार का रैक तैयार करें। कीड़ों को बाहर निकलने से रोकने के लिए सभी तरफ 15 सेंटीमीटर की सीमाएं भी तैयार करें। आप प्रत्येक स्तर के बीच 50 सेंटीमीटर की दूरी के साथ तीन स्तरीय प्रणाली रख सकते हैं।
बांस की ट्रे पर अखबार या पैराफिन पेपर फैलाएं। आपको ऊपरी परत को कागज़ों से ढकने की ज़रूरत नहीं है। छठी पत्तियों से कीड़ों को खिलाएं। भोजन के लिए प्ररोहों को वैकल्पिक रूप से रैक में रखें।
दिन में 2 से 3 बार दूध पिलाना जरूरी है। पालन-पोषण के प्रत्येक चरण में आपको आर्द्रता और तापमान का ध्यान रखना होगा। यदि आर्द्रता कम है तो आप आर्द्रता बढ़ाने के लिए ह्यूमिडिफायर का उपयोग कर सकते हैं। और यदि आर्द्रता अधिक है तो आर्द्रता कम करने के लिए हीटर या वेंटिलेटर का उपयोग करें।
पालन-पोषण ट्रे में नमी कम करने के लिए आप चूना छिड़क सकते हैं। यदि आप ट्रे में पालन कर रहे हैं और पत्तियां खिला रहे हैं तो तीसरे चरण से प्रत्येक ट्रे में केवल 250 कीड़े हैं।
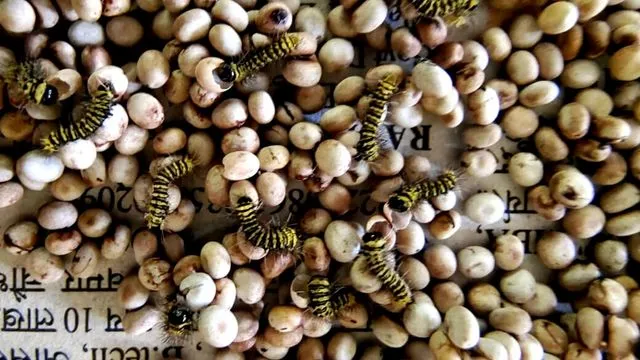
तीसरा इंस्टार 3 से 4 दिन तक, चौथा इंस्टार 4 से 5 दिन तक और 5वां इंस्टार 7 से 8 दिन तक चलेगा। और पहले इंस्टार के बाद प्रत्येक इंस्टार से पहले, कीड़े निर्मोचन से गुजरेंगे।
तीसरे चरण के अभ्यास के बाद प्रतिदिन सुबह के समय बिस्तर की सफाई करें। सफाई के लिए उपयुक्त जाली आकार के जाल का उपयोग करें। आपको प्रत्येक निर्मोचन से पहले और बाद में बिस्तर की सफ़ाई का भी अभ्यास करना होगा। और जब कीड़े गलन से जाग जाएं तो बिस्तर कीटाणुनाशक का प्रयोग करें।
देर से पालन-पोषण के दौरान आप पत्तियों को बिना काटे सीधे कीड़ों को खिला सकते हैं।
कताई
5वें चरण के अंत में, कीड़े भोजन करना बंद कर देंगे और घूमना शुरू कर देंगे। इस चरण के दौरान आपको सावधानी से पके हुए कीड़ों को ट्रे से चुनना होगा और फिर उन्हें कोकून की कताई के लिए माउंटेज में स्थानांतरित करना होगा। पके हुए कीड़े थोड़े पारभासी होते हैं और घूमने के लिए अपना सिर ऊपर की ओर उठाते हैं।
यदि आपको कीड़ों में बीमारी के कोई लक्षण दिखाई दें तो उन्हें हटा दें। इससे बीमारियों को फैलने से रोकने में मदद मिलेगी.
100 डीएफएलएस के लिए आपको 30 से 40 चंद्रकी माउंटेज की आवश्यकता होगी। आप प्लास्टिक माउंटेज का भी उपयोग कर सकते हैं। आम तौर पर किसान इन माउंटेज को पालन ट्रे के ऊपर रखते हैं और कीड़े कोकून कातने के लिए रेंगते हैं। कताई के दौरान कमरे में 60 से 70% सापेक्ष आर्द्रता बनाए रखें।
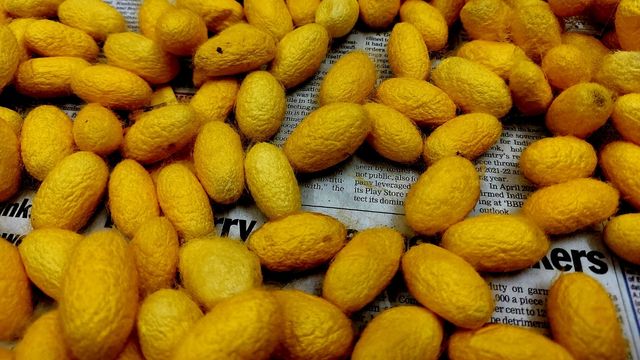
फसल की कटाई
कताई शुरू होने के 5वें से 7वें दिन के बाद ही कोकून की कटाई शुरू करें। ऐसा इसलिए है क्योंकि हम चाहते हैं कि कोकून के अंदर प्यूपा परिपक्व और कठोर हो। कटे हुए कोकून को ट्रे में इकट्ठा करें और एक अलग कमरे में रखें।
रेशमकीटों के कीट एवं रोग
रेशमकीट पालन में अक्सर कहा जाता है कि इलाज से रोकथाम बेहतर है। क्योंकि एक बार जब आपके रेशमकीट रोगज़नक़ों से संक्रमित हो जाते हैं तो उन्हें ठीक करना लगभग असंभव हो जाएगा। इसलिए आपको कीड़ों के पालन के दौरान सावधान रहने की जरूरत है।
किसी भी प्रकार के कीट और बीमारी के संक्रमण से बचने के लिए बिस्तर कीटाणुनाशक का उपयोग करें, बिस्तर की सफाई का अभ्यास करें और पर्याप्त तापमान और आर्द्रता बनाए रखें।
बिस्तर की सफ़ाई
आम तौर पर शहतूत की पत्तियों को कीड़ों द्वारा खाए जाने की तुलना में बहुत अधिक मात्रा में खाना पड़ता है। इसलिए, यह स्पष्ट है कि प्रत्येक भोजन के अंत में बड़ी मात्रा में बिना खाए हुए पत्ते, कमोबेश भोजन के लिए अनुपयुक्त अवस्था में, बिस्तर या ट्रे में रह जाते हैं।
इसके अलावा, मल भी होता है जिसे कीड़े छोड़ देते हैं और यह सब एक मोटा और अक्सर गीला बिस्तर बन जाता है जिसे रहने नहीं दिया जाना चाहिए। कूड़े को जमा करने से क्यारियों में नमी आ जाती है और किण्वन की प्रक्रिया शुरू हो जाती है, जिससे हानिकारक गैसें पैदा होती हैं और रोगजनक सूक्ष्म जीवों की वृद्धि को बढ़ावा मिलता है।
इससे कीड़ों का स्वास्थ्य ख़तरे में पड़ जाता है। रेशमकीटों को स्वस्थ रखने के लिए, पालन-पोषण क्यारियों पर जमा कूड़े-कचरे के साथ-साथ बेकार शहतूत की पत्तियों आदि को समय-समय पर हटा देना चाहिए। इस प्रक्रिया को "बिस्तर सफाई" कहा जाता है।
सफ़ाई की आवृत्ति
कीड़ों के स्वास्थ्य और स्वच्छता के दृष्टिकोण से, ऐसा प्रतीत होता है कि जितनी अधिक बार सफाई होगी, उतना ही बेहतर होगा, लेकिन व्यवहार में महत्वपूर्ण सीमाएँ हैं। सबसे पहले, सफाई में श्रम शामिल होता है और बार-बार सफाई करने से रेशमकीट पालन का अर्थशास्त्र ख़राब हो जाएगा।
लेकिन बार-बार सफ़ाई करने से बचने वाला सबसे महत्वपूर्ण बिंदु है कीड़ों का नष्ट होना जो हर सफ़ाई में एक अपरिहार्य घटना है। विशेष रूप से प्रारंभिक चरण में, तंबू की सफाई में कीड़ों का नुकसान बहुत अधिक होता है। उपरोक्त को ध्यान में रखते हुए, बिस्तर की सफाई के लिए निम्नलिखित कार्यक्रम को लाभदायक तरीके से अपनाया जा सकता है।
विवरण इस प्रकार है:
I स्टेज: मोल्ट से पहले एक बार
द्वितीय चरण: दो बार यानी, एक बार निर्मोचन के तुरंत बाद, और फिर द्वितीय निर्मोचन के लिए तैयार होने से पहले।
तृतीय चरण: तीन बार यानी एक बार निर्मोचन के बाद, एक बार तीसरी आयु के मध्य में और एक बार चतुर्थ निर्मोचन के ठीक पहले।
चरण IV और V चरण: पहले भोजन के बाद हर दिन सुबह एक बार।
रेशम उत्पादन पर अक्सर पूछे जाने वाले प्रश्न
A silkworm spin a cocoon in how many days?
Silkworm can spin a cocoon within 3 to 4 days. But you should not harvest immediately after spinning of cocoon is completed. It is because worm inside the cocoon is still in prepupal stage during this time.
Silkworms can complete cocoons in a day True or false?
False, silkworm takes 3 to 4 days to spin a cocoon.
Silkworms eat the leaves of which plant?
It totally depends on which silkworm you are talking about. Mulberry silkworms feed on mulberry leaves, Tasar silkworm feeds on oak leaves, Eri silkworm feeds on castor leaves while Muga silkworms feeds on Som or Sualu leaves.