From this ultimate guide on sericulture you will be able to know what is sericulture, how to cultivate mulberry, silk rearing and production. If you are willing to gain good information on this topic then this article is definitely going to help you a lot.
You will also get to know about economics involved during the complete production process. Moreover, silk production requires knowledge and skills, that’s why not everyone can get successful.
So keep reading till the end and do not miss out any important topic. The information that I am sharing in this article roots from years of research, trials, and adoption in Regional Sericulture Research Station, Kalimpong, India.
I sincerely thank Scientist-D Dr. Zakir Hussain, and Scientist-C Dr. Harish Babu for their contribution in the field of Sericulture.
Table of Contents
What Is Sericulture?
We can define in simple words that sericulture is an art or branch of science that includes study and practice of all the activities involved in the production of raw silk. It comprises of Moriculture (Mulberry Farming), Silk worm rearing, cocoon production and the finally raw silk.
Silk products are in huge demand and that’s why price of 1 kilogram of cocoon varies from 400 to 750 Indian Rupees. However rare type of silk like Muga can have much higher prices in the market. This is because the cultivation of Muga silk can only be practiced in Assam region of India.
However, silk production is a complex and technical process, hence requires knowledge and skill.
Types Of Silk
In the world there are 4 types of natural silk, and that are Mulberry silk, Eri silk, Tasar silk, and Muga silk. And all these 4 types of silk are present in India. 90% of the total production of natural silk in the world comes from mulberry silk.
This is mainly because of the adaptability of mulberry silk worm, economic threshold, life cycle, and feeding habit. Not all silk worm can be domesticated. This will become more clear after reading the topics that are given below.
Mulberry Silk
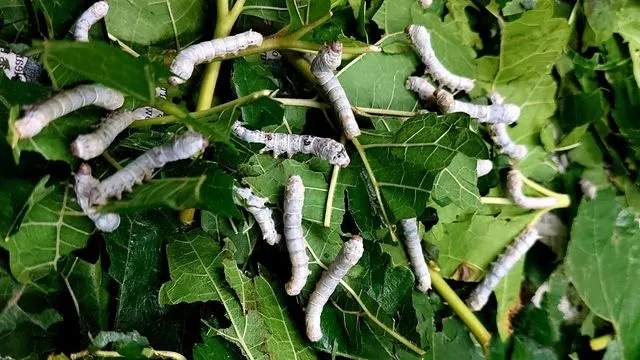
It is the most commonly produced silk in the world. As you already know that 90% of the natural silk in the world belongs to mulberry silk. But the credit for this achievement goes to the silk worm “Bombyx mori.”
It is the primary producer of silk and loves to feed on mulberry leaves. However, it can also feed on Osage orange and lettuce leaves but then the yield decreases. It is also the only silkworm that can be domesticated successfully.
Mulberry silkworms can be of univoltine, bivoltine or multivoltine races depending on voltinism. In the global market the demand for bivoltine silk is higher because of its quality. However, it is not possible to domesticate bivoltine race in every region.
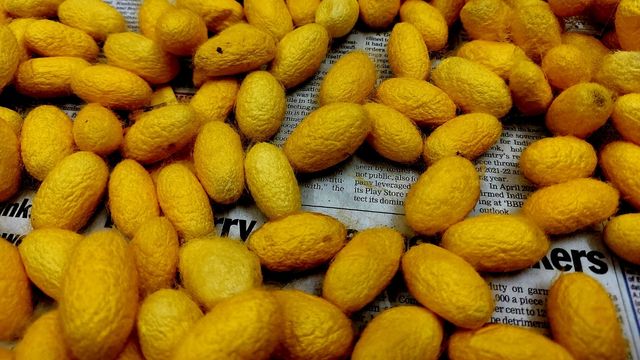
Cocoons produced by mulberry silkworm are generally white in colour and they are closed ended cocoons. Although cocoon produced by crosses of bivoltine and multivoltine silkworm are light yellow in colour.
We will be discussing about these races in depth in later portion of this article.
Eri Silk
The worm responsible for production of Eri silk is “Philosamia ricini,” and it is a semi domesticated silk worm. Eri silkworms are generally found in Japan, China and north-eastern part of India. The term “Eri” was used because of the feeding host of this silkworm.
Eri silk worm feeds on Castor leaves, which in Eri silkworm’s local region, i.e., Assam (India) is called “Eri.” And that’s why these worms are named Eri silkworms. However, unlike mulberry silkworm, Eri silkworm is polyphagous.
Which mean it can also feed on some alternative plants that are Topioca, Brapat, Kesseru, Gulancha, Gamari, etc. Although the primary feed is castor. Eri silkworms are of multivoltine race and cocoons produced by them are open ended cocoons.
The colour of cocoons can be white to off white in colour and that’s why Eri silk is also called “Peace silk” or “Ahimsa Silk.” Eri silkworms are also known as Endi or Errandi.
Tasar Silk
The worm responsible for production of Tasar silk is “Antheraea mylitta,” this silk worm can not be domesticated and is of bivoltine race. Tasar silkworm feeds on Asan, Sal, Oak and Arjun plant leaves. Antheraea proyeli feeds primarily on oak tree leaves hence it is known as Oak tasar silkworm.
And the silk produced by Oak tasar silkworm is known as Oak Tasar silk. The colour of the silk produced is coppery.
Muga Silk
The multivoltine silkworm responsible for production of muga silk is “Antheraea assamensis.” Muga silk worm primarily feeds on leaves of Som and Sal. Due to the golden yellow colour and quality of the muga silk, its economic value is much higher than other types of silk.
However, till today muga silk can only be produced successfully in Assam, India. That’s why producing muga silk is region specific and hence only farmers of Assam can involve themselves in producing muga silk. Due to this region Muga silk is also known as “Pride Of Assam.”
You will also love reading them,
ALSO READ: How To Get Farm Loan
ALSO READ: Orchids Farming Guide
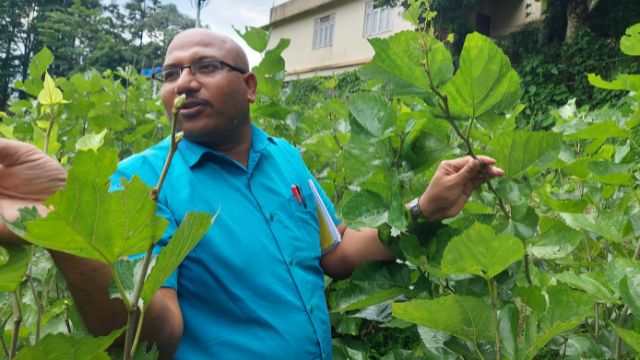
Mulberry Farming Guide
If you are interested in sericulture, then first you will need to understand Moriculture, i.e., cultivation process of Mulberry. Because to start silkworm rearing you will need to have their feed ready, i.e. mulberry leaf.
Now you must be thinking, what if I only practice silkworm rearing and get mulberry leaves directly from the market as feed?
But, economically that’s a deal of loss and I don’t want to see your farming venture go down. That’s why it’s always advisable to have an established mulberry garden well before starting rearing of silkworms.
There are other factors responsible for need of a mulberry garden that you will get to know in later portion of this article.
Just like silkworms, not all mulberry varieties are suitable for every region. Hence even before starting plantation of mulberry garden you will need to know best mulberry varieties suitable for your region.
Apart from these factors, fertilizer amount, irrigation frequency, and spacing also varies due to rainfed or irrigated farming practices. There are other aspects too that you need to understand to get started.
However, if you want to keep it simple, then you can start mulberry farming. But you can avoid silkworm rearing up to 3rd instar (Chawki rearing). Instead you can purchase chawki worms from government bodies or other farmers and then continue the process up to production of cocoons.
It is because till chawki rearing, handling and care requires great skills, time, equipments and experience. But in late age rearing the process becomes much easy.
So let’s start knowing about them step by step.
Climate
Climatic requirements can vary depending on cultivar of the mulberry tree. We can also say this as vice-versa, that selection of variety depends on local climatic conditions.
For example, BC259, Tr-10, or Tr-23 variety of mulberry are suitable for hilly regions (Kalimpong). Whereas S1635, S34, S13, or Viswa varieties are more suitable hot arid regions of Karnataka.
But the ideal average temperature range of 24 to 28o Celsius with relative humidity of around 65 to 80% are considered favourable. Humidity, temperature, and rainfall plays a major role in growth and development of not only mulberry plantation but also in silkworm’s life cycle.
6 to 12 hours of sunlight daily and rainfall in the range of 600mm to 2500 mm annually is suitable. In case of scarce rainfall, irrigation is necessary to fulfil crop water needs.
Soil
Slightly acidic(6.0-6.8pH), well drained, loamy soil is ideal for cultivation of mulberry. But you can also cultivate them in sandy to clayey soil. Avoid mulberry farming in saline and alkaline soil, as they can affect growth of the plant.
Propagation
Vegetative propagation method like semi-hardwood cutting is one of the best method to propagate mulberry for large scale plantation. Take cuttings only from 8 to 12 months old, well established mulberry garden.
Take 15 to 20 centimetres long cuttings with 3 to 4 active buds. Make sure to sharp cut at an angle of slanting 45 degrees. While taking cuttings avoid splitting of the bark as it can lead to poor development of the plants.
You can use power operated mulberry cutter for better results. Before plantation of cuttings in nursey treat the bottom end for 30 minutes with 1 kilogram of Azospirillum culture mixed in 40 litres of water.
Nursery Management
If you want to raise mulberry saplings for transplantation or selling to farmers involved in sericulture, then you need to manage nursery. For one hectare mulberry plantation, 800 m2 area of nursery is sufficient.
Remove all debris and weeds, apply 1600 kilograms of Farm Yard Manure, and prepare raised beds of 4 x 1.5 metres size. Alongside prepare drainage channel and avoid shady area for nursery. Cover borders with nets to minimize the risk of infestation.
Cuttings Plantation
For better rooting, and infestation free saplings, time to time inspection is necessary. Irrigate before plantation of cutting and follow spacing of 15 x 7 centimetres between cuttings. Plant the bottom end i.e., potion that has cut at 45 degrees.
Irrigate once after every three days, and keep control over termites, and fungal diseases to ensure good results. After around 90 to 120 days from planting your saplings will get ready for transplantation.
You can either use this saplings for plantation in your field or you can sell them in the market.
Mulberry Plantation
Rainy season is the best season to plant saplings in the mulberry farm. So, according to the plantation time you can plan date of raising saplings in the nursery. Avoid plantation of mulberry during harsh summer and winter.
Follow either ridges and furrow or pit system for plantation. You can plant well rooted mulberry saplings at depth of around 1 feet.
Spacing plays vital role in productivity, infestation, etc. Therefore you should always follow recommended spacing for your region to get optimum leaf yield. If you follow spacing of 3×3 feet in one acre then you can plant around 4,938 mulberry plants.
If you are looking for gaining extra income from the farm then you can also plan for intercropping. However, if you wish to incorporate intercropping then you should understand plantation in depth.
For economical leaf yield it will take around 8 to 12 months in hills for establishment of mulberry garden. But in plains it takes only near about 6 months.
Depending on maturity time of leaves you need to plan rearing of silkworms, or else you will end wasting your time and money.
Fertilizers
Applying organic or inorganic fertilizer depends on you, but you need to fulfil plant fertilizer needs. In case of irrigated farming, 300 kilograms of nitrogen, and 120 kilograms of Phosphorus and Potassium are required in 6 split doses.
Three months after plantation you can apply first doze. And after first dose, apply next doses after every leaf harvest and pruning.
But for rainfed condition, 100 kilograms of nitrogen and 50 kilograms of phosphorus and potassium are required in 2 split doses.
You can also use bio-fertilizers such as jeevamrut, panchgavya, etc. along with organic manure to increase overall yield. In case of deficiency symptoms of micronutrients also apply required micronutrient such as 5 grams zinc sulphate, 2.5 grams borax, 2.5 grams manganese, etc.
Irrigation
In case of irrigated system, ridge and furrow method is considered to be most efficient. For better production you can also adopt drip irrigation method.
Irrigation frequency varies according to local environment, in region of high rainfall, irrigation frequency will be less.
Inter-culture Operations
Inter-culture operation such as weeding, pruning, mulching, are important activities in the mulberry garden. Grassy weeds such as Bermuda grass, nut grass, and broad leaves weed such as Tridax, pig weed, hog weed, carrot grass, etc. can reduce overall production.
Weeding
You can follow cultural methods such as removal of weed at the time of field preparation, cleaning of implements and using weed free manure to prevent growth of weeds.
After plantation you can adopt mechanical weed control methods. Operations such as removing weeds by hand hoe helps in controlling weeds. But even then if you notice vigorous growth of weeds then you can adopt chemical control methods.
You can use Paraquat @2 to 3 litres per hectare for controlling weeds after their emergence.
Mulching
It has multiple roles. Mulching will help you in controlling weed growth, reducing soil moisture, conserving soil moisture, reducing irrigation need, etc. You can use straw, dried leaves, etc. for mulching.
Pruning
Once in a year you should practice bottom pruning. In this method, cut the plant at the ground level by leaving 10 to 25 centimetres stump above ground level.
Along with bottom pruning, you should also go for middle pruning. In this method, cut branches 40 to 60 centimetres above ground level.
In closely planted area practice Kolar pruning. In this method, cut branches at ground level every time after harvest. So by following this method you will be pruning up to 5 times in a year.
Pests & Diseases
Just like any other plant, mulberry is also prone to pest and diseases. These tables will help you to identify and control them efficiently.
Pests
| Pests | Symptoms | Management |
|---|---|---|
| Leaf Webber (Diaphania pulverulentalis) | Makes silken web among the apical leaves. Feed by scraping the tissue. Rolls up the tender leaves. Feed on whole leaf leaving the midrib and veins. | Apply 0.2% DDVP (Nuvan) once in 10 days Release pupal parasitoid Tetrastichus howardii @1,25,000 adults/ha and Trichogramma chilonis @ 3 Trichocard/week/ha. |
| Mealy Bug (Maconellicoccus hirsutus) | Affected plants show curling of leaves at the growing point. Leaf area decreases due to crinkling. Malformation of apical shoot producing multiple shoots. | Apply 0.2% DDVP @ 15-20 days after pruning. Release Cryptolaemus montrouzieri @300 beetle/ac. |
| Papaya mealy bug (Paracoccus marginatus) | Malformation of affected portion. Stunted growth. Yellowing of leaves. Sooty mould on leaves. | Spray 0.2% DDVP (Nuvan) once in 10 days. Release Acerophagus papayae @250-300 adults per acre. |
| Thrips (Pseudodendrothrips mori) | Formation of white streaks in early stage followed by silvery blotches. Severe infestation – retarded growth, malformation. | Spray Nuvan (0.02 %), or Rogar (0.1 %) (safe period of 8-10 days). |
Diseases
| Diseases | Symptoms | Management |
|---|---|---|
| Powdery mildew (Phyllactinia corylea) | White powdery patches on the lower surface of the leaves. Corresponding portions on the upper surface develop chlorotic lesions. White powdery patches turn to brownish-grey, black, yellowish and leathery. | Spray 0.1% Carbendazim 50% WP (Bavistin) (2 g/lit. water), or 0.2% Sulphur 80WP(Sulfex) (2.5 g/ litre). |
| Leaf rust (Cerotelium fici) | Pin head shaped brown to black pustules on the lower side. Yellowing of leaves and premature defoliation. | Apply 0.2% Copper Oxychloride 50WP (Blitox) (4 g/litre). |
| Leaf spot (Cercospora moricola) | Initially brownish necrotic irregular spots appear. Spots enlarge & join together. Leaves turn yellow and wither-off. | Spray 0.1% Carbendazim 50% WP (Bavistin) (2 g/litre). |
| Root rot (Macrophomina phaseolina) | Sudden withering of leaves. Plants fail to sprout after pruning and dry up completely (wilting). Affected plants can be pulled out easily. Rotting of root. Rotten roots turn black and roots contain large number of black scleroti. Decay of root bar. | Uprooting and burning. Application of Neem cake @ 1 ton/ha in four split doses. Application of Trichoderma viride @25 g/plant. Drenching the soil with carbendazim @ 250 ml of 1% concentration per plant. |
Tips: If possible then keep checking mulberry garden regularly. In case of any infestation, immediately remove the affected part and discard or burn them away from the main field.
Harvesting
Harvesting is very important step in mulberry farming. You should only harvest during early morning to ensure good quality leaves. Avoid harvesting of leaves just after rains. You can harvest by one of these three methods.
Leaf picking, branch cutting and whole shoot harvest. You will be understanding more about harvesting of mulberry leaves in rearing section given below. That portion will help you to understand which leaves you have to harvest and at which stage.
Silkworm Rearing
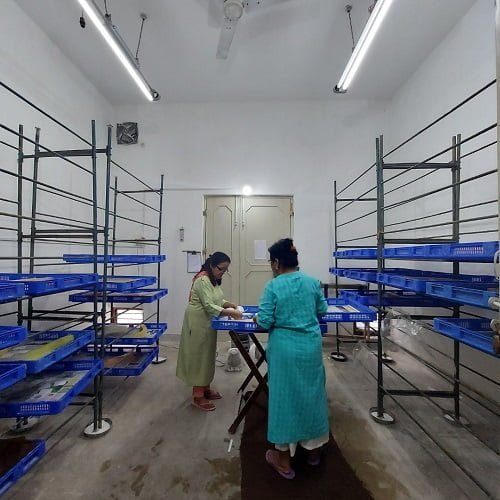
Rearing of silkworms is itself a skill, and an art that farmers need to excel to become successful. Before understanding rearing of silkworms you need to learn about rearing house.
Silkworms are prone to temperature, humidity, sunlight, pests, and diseases. Hence you will need to provide them optimum environment in a rearing house. Along with rearing house you also need to get familiar with rearing equipment.
Rearing House
Select a location that is away from waterlogging condition. For high rainfall region, select dry, sunny, well-ventilated and drained land. But for less rainfall region, select cool and moist land. But avoid constructing rearing house in region where bright sunlight is present throughout the day.
You can construct Thatched, Asbstar roof, RCC roof, or Tile roofed rearing house. If you think that it is quite complex and costly process then you will be surprised to know about subsidies offered by the government of India.

At the end of this article I will be discussing about subsidies in detail. Moreover, if you are willing to learn more about rearing house in depth, then contact us through our contact us page or on Facebook or Instagram.
Once you have constructed rearing house then you need to get familiar with rearing equipment. Without them you can not handle silkworm rearing.
Rearing Equipment
You will need to have rearing stands, rearing trays, ant wells, paraffin paper, foam rubber strips, chopsticks, feathers, sprayers, humidifier, thermo-hygrometer, fridge, etc. in your silkworm rearing house. We will learn about them one by one to get better insight.
Rearing Stands
They are frames in which you have to place rearing trays containing silkworms. The material of the frame could be wood, bamboo, or iron. However, lot of farmers are using rearing stands made from bamboo due to low cost and easy handlings.
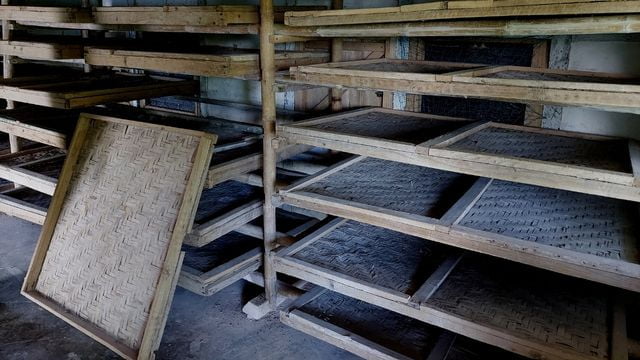
2.25 metres height, 1.5 metres length, and 0.65 metres width is ideal for a frame of rearing stand. There should be 10 to 12 tiers in each stand spaced 0.15 metre between each two tiers.
In single room of your rearing house you can have six such stands.
Ant Wells
Ants can create serious problem in rearing silkworms, therefore we must avoid there presence around silkworms. That’s why every leg of the rearing stand should rest on ant well. You can take 20 centimetres wide and 4 to 5 centimetres deep enamelled plate as ant wells.
Rearing Trays
They are portable and helps in managing silkworms during rearing. And there are many types of rearing trays available that differ from one other in material, shape, and size. The most common rearing trays are boxes or trays with dimension of 1.2 metre 0.9 metre 12 centimetres.
Two such tray are required to rear 100 Disease Free Layings (dfls) up to second instar. You will understand dfls and instar in later portion of this article in rearing portion.
Paraffin Paper
It is a thick craft paper coated with a paraffin wax that has melting point of 55o Celsius. During rearing in trays, you can use paraffin paper to cover silkworms. This helps in preventing withering of leaves and maintaining required humidity in rearing bed.
Foam Rubber Strips
Long foam rubber strips of 2.5×2.5 centimetres thick dipped in water are useful for maintaining humidity in rearing tray. Generally you need to keep them around silkworm rearing beds during the first two instars.
Chopsticks
Young aged larvae are delicate and should not be touched directly with hands. Hence, chopsticks made up of bamboo can be used for picking young aged larvae.
Feathers
Feathers of bird are essential to carryout brushing newly hatched silkworms in rearing tray. Using feathers for brushings helps in avoiding any kind of infection or damage due to human touch.
Cleaning Nets
They are necessary to carry out bed cleaning practices. At every stage of development, periodically leaf leftovers and silkworm’s litter should be removed with the help of cleaning nets. It helps to maintain the hygiene inside rearing tray.
Feeding Stand
They are small wooden contrivances that have cross-legs about 0.95 metre high. Feeding stands are necessary for keeping rearing trays for feeding and cleaning.
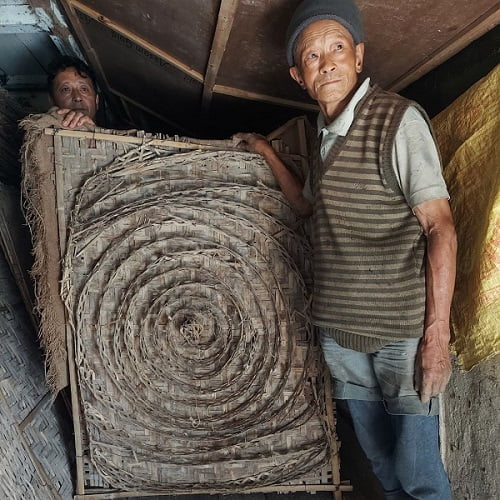
Mountages
They are used to provide adequate space to ripe worms for spinning cocoons. “Bamboo Chandrike” is the most common type of mountage used by farmers in India. Bamboo chandrike comprises of rectangular mat on which is fixed a spiral of bamboo tape.
However there are other type of mountages too, and the choice depends on farmers. Chandrike mountage is cost effective, easily available, easy to handle, and can be used for longer duration.
But other types of mountage such as Rotary, plastic, bottle brush, plastic bottle brush, bamboo strip mountage, etc. are also useful. There are other required equipments too, such as chopping boards, knives, mats, etc.
Once you are familiar with equipments, then let’s start understanding silkworm rearing. But you will also need to know about disinfectant before starting rearing. However, to make it easier for you I will be discussing about disinfectants after rearing.
Disinfection
Silkworms are susceptible to a number of diseases: Bacteria, Fungi, & parasites attack the silkworms readily. Once they break out, the disease spread quickly. To prevent the incidence of these diseases, it is necessary to maintain sanitation and adopt hygienic techniques.
The rearing room and appliances should be thoroughly cleaned. Dust, dirt and refuse as also dead larvae found in the rearing house and on the wearing appliances should be removed and thoroughly washed with water.
First of all, all the rearing appliances should be placed inside the rooms and disinfected with Sanitech solution or 5% bleaching powder solution with the help of spray machine. All the rearing equipments besides the walls, ceiling and roof of the rearing rooms should be sprayed.
Soon after spraying, the room is closed for 15 to 20 hours. Afterwards, the doors and windows are opened and the room is kept exposed for nearly 24 hours for the traces of the chlorine gas to disappear.
The proper time for carrying out general disinfection is two to three days prior to hatching of the silkworms eggs.
Presently some type of chemicals are available for disinfection of rearing rooms equipment.
40% strength Formaldehyde Solution Presently is banned for commercial use. Only recommended for washing of silkworms eggs. Sanitech Solution is recommended for disinfection purpose. Nirmool is a newly room disinfectant developed by CSR&TI Berhampore and is under experimental trial.
How To Use Sanitech?
- Activation is initiated by adding 50 gm. Activator for every 500ml, of Sanitech in a clean container.
- Leave the preparation for 5 minutes to allow complete dissolution the crystals till colour changes to yellow.
- This yellow coloured 500 ml sanitech solution should be diluted with 19 litres of water.
- Dissolve 100gm of lime in 500 ml water in another clean container.
- This 500 ml. lime water should be mixed with 19.5 litres of prepared solution as mentioned above.
- This solution should be used to disinfect silkworms rearing houses and equipment.
Steps For Usage
- It should be used at the rate of 2 litres for every square meter of the floor area to disinfect the silkworms rearing house.
- Silkworms rearing equipments should be disinfected with the systematically prepared solution at the rate of 400ml. for every square meter.
- The solution prepared by adding (25 ml. Sanitech +5 gm of slaked lime) can be used for disinfection of silkworms eggs surface, as it is very effective compared to other disinfections.
- The same solution can also be used for washing hands (before entering in rearing room & after exiting), legs and also for cleaning the rearing houses.
Recommended Bed Disinfectants
1. Labex
2. Sericillin
3. Vijeta
4. Ankush
5 Seriwin (Under experimental/ trial).
In general, after settling for every moult plain lime powder should be applied on the bed of silkworm with the help of muslin cloth or sieve to sprinkle lime powder. After moult out, any above bed disinfectant should be applied just half an hour before giving the first feeding.
Rearing Of Silkworms
In hilly regions you can practice rearing 2 to 3 times in a year, but in plains you can practice rearing up to 6 times. 1 dfls (500 eggs) require 12 to 14 kilograms of mulberry leaves for rearing. However there is one common myth among farmers.
That is if they feed more leaf then production will increase. But this is quite opposite. You have to provide leaf in optimum range for good production. Increasing or decreasing leaf feed than the optimum range will result in poor cocoon production.
From 1 acre of mulberry garden you can feed 250 to 300 dfls of silkworm.
Before starting rearing, you need to disinfect rearing room and equipments. It is required to prevent silkworms from pests and diseases. So let’s start understanding rearing of silkworms.
Rearing of silkworms can be divided into 10 steps that starts from incubation and ends at harvesting of cocoons.
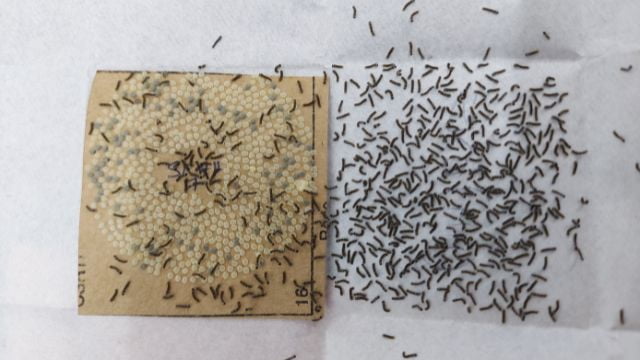
Incubation
Mulberry silkworms can be bivoltine or multivoltine in nature. Bivoltine silkworms eggs goes under diapause for six months. Therefore they need HCl treatment to break diapause for hatching. But before treating with HCl acid you need to dip the egg sheets/chords in 2% formalin solution.
This will help to disinfect eggs as well as makes the eggs to adhere firmly to the egg sheets during treatment with acid. Leave egg sheets to dry before treating them in acid.
Acid Treatment
There are two types of HCl treatment, they are hot and cold acid treatment. The process will become clear from this table.
| Parametres | Hot Acid Treatment | Cold Acid Treatment |
|---|---|---|
| Age of egg | 20 to 24 hours | 15 to 20 hours |
| Specific Gravity | 1.075 at 15o Celsius | 1.10 at 10o Celsius |
| Temperature of acid solution | 46o Celsius | 25o Celsius |
| Duration | 5 minutes | 60 to 90 minutes |
Immediately after acid treatment wash the egg sheets with running water. Ensure that no traces of acid remains on the sheet. This practice is required because traces of acid can affect hatching.
10 days after acid treatment eggs will start hatching.
Egg Preservation
If you want to postpone the acid treatment due to certain reason then you can also do it through cold storage. Before 20 hours of oviposition, store eggs at 5o Celsius and 70-80% relative humidity in freeze for up to 5 days.
Then before acid treatment increase temperature to 15o and then 25o Celsius for 1 to 2 hours each.
But if you have already treated bivoltine eggs with acid then also you can store them on 2nd to 3rd day after treatment. Keep the eggs at 5o Celsius and 70-80% relative humidity for up to maximum 20 days.
In this case you will have to keep eggs at 15o Celsius for 2 to 3 hours before and after preservation. We practice egg preservation to synchronize egg hatching at the same time. It is necessary to save time and increase efficiency.
Black Boxing
Once you are set for hatching of eggs, keep them at 25o Celsius at 70 to 80% relative humidity in rearing room. Once the pin head initiation starts then you have to wait for eggs to turn completely blue in colour.
If all egg sheets are not changing colour together then keep the egg sheets that are ready for hatching at 5o Celsius in fridge. Once all eggs are ready then you need to practice black boxing.
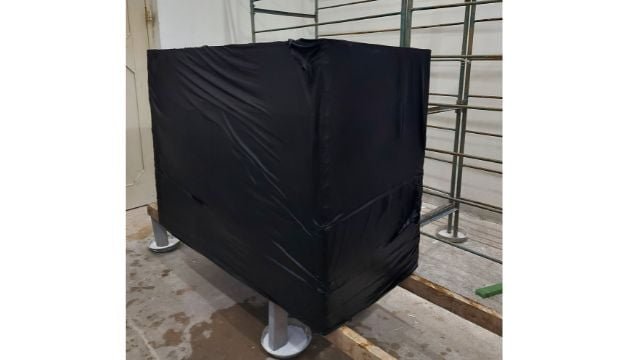
You have to take black coloured cloth and dip it in water. Take out the cloth and squeeze out the water. Cover the rearing tray containing eggs with black cloth completely and turn off all the lights in the room.
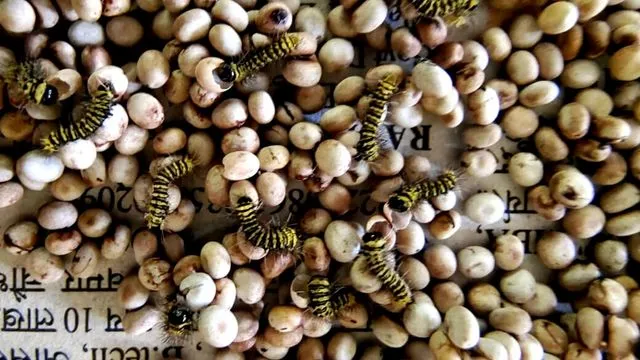
After 48 hours immediately turn on lights and remove black cloths and expose eggs under light. This will initiate hatching of eggs. Newly hatched eggs look like small ants in structure.
Brushing
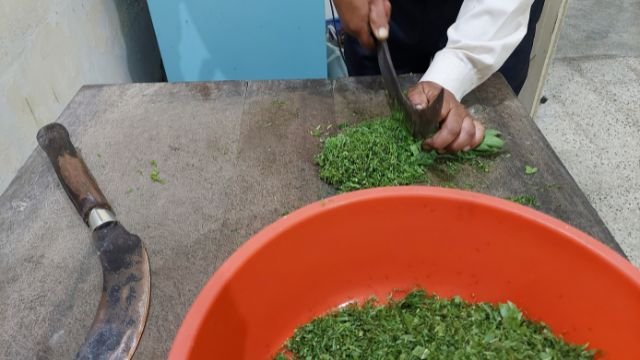
Before brushing you will have to get silkworm’s feed ready. Now you will have to take care that during early stages you can not feed mature mulberry leaves. Harvest 3rd or 4th leaves from the top to 6th leaves of mulberry plant and chop it to 0.5 sq. cm. size with the help of chopping knife.
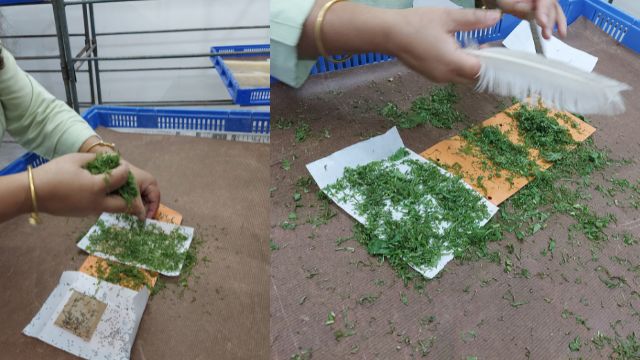
Sprinkle a handful of chopped leaves on egg sheet and then carefully brush worms from egg sheets with the help of feathers. After brushing cover the region with foam rubber strips from both sides. Then finally cover the rearing tray from upper and lower end with paraffin paper.
This will help to maintain adequate moisture in the rearing tray.
Chawki Rearing
Young age silkworm rearing or chawki rearing ends at 2nd instar. There are total five instars and four moults during rearing process. Before every instar after 1st instar silkworm will go under moulting. During this transition stage they require special care.
You need to practice bed cleaning before and after moulting. During moulting worms will stop feeding and raise their head upwards. 1st instar lasts up to 3 to 4 days. Therefore a day before initiation of 1st moulting you have to practice bed cleaning.
During moulting remove the top paraffin cover.
Bed Cleaning
Use 0.5×0.5 centimetre mesh size net. Spread this net over the rearing bed and give the feed. Worms will crawl up to this fresh leaves. Once they have crawled up successfully then transfer them to another tray.
Discard all the leftovers in the tray and then you can transfer worms again in the rearing tray. Once worms begin moulting then stop feeding and dust 30 to 50 grams of lime per m2. Do not disturb the worms during moulting.
The 2nd instar lasts up to 2 to 3 days and is of shortest duration among all instars.

You will to practice bed cleaning after worms start feeding again and before 2nd moult for Chawki rearing. Once worms come out from moulting then you can also use disinfectants like Labex to keep worms safe from diseases.
Late Age Rearing
3rd, 4th, and 5th instar larvae are late age worms. If you are a farmer and you want to avoid all the tussle then you can start rearing from this stage. Moreover instead of leaf picking you can practice shoot rearing from this stage.
That is you can harvest and feed shoot cut at 1 metre height from ground level to the worms. This method of rearing is easy and will save time and money. But you can only practice it during late age rearing.
For shoot rearing, prepare rack of 1.2×11 metre size for rearing 50 dfls. Also prepare borders of 15 centimetres on all side to prevent worms from escaping. You can have three tier system with spacing of 50 centimetres between each tier.
Spread newspapers or paraffin papers on bamboo trays. You do not need to cover top layer with papers. Feed worms from 6th leaves onwards. Place shoots alternatively in racks for feeding.
Feeding 2 to 3 times in a day is required. In every stage of rearing you need to take care of humidity and temperature. If humidity is low then you can use humidifier to increase humidity. And if humidity is high then use heaters or ventilators to decrease humidity.
To decrease humidity in the rearing tray you can dust lime. If you are rearing in trays and feeding leaves then have only 250 worms in each tray from 3rd instar.
3rd instar will last up to 3 to 4 days, 4th instar up to 4 to 5 days, and 5th up to 7 to 8 days. And before every instar after 1st instar, worms will undergo moulting.
After 3rd instar practice bed cleaning every day during morning. Use nets of appropriate mesh size for cleaning. You will also have to practice bed cleaning before and after every moult. And just after worms awake from moulting then use bed disinfectant.
During late age rearing you can feed leaves directly to the worms without chopping.
Spinning
At the end of 5th instar, worms will stop feeding and will begin spinning. During this stage you will have to carefully pick ripe worms from the tray and then transfer them to mountages for spinning of cocoons. Ripe worms are slightly translucent and raise their head upwards for spinning.
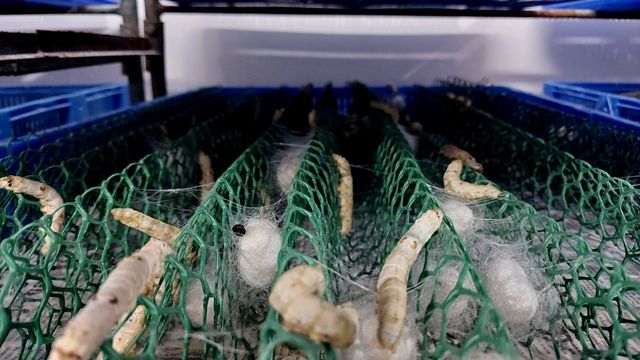
If you notice any signs of disease in worms then discard them. This will help to prevent spread of diseases.
For 100 dfls you will need 30 to 40 Chandraki mountages. You can also use plastic mountages. Generally farmers keep these mountages over rearing tray and worms crawl up for spinning cocoons. During spinning maintain 60 to 70% relative humidity in the room.
Harvesting
Start harvesting of cocoons only after 5th to 7th day from spinning initiation. This is because we want pupae inside cocoons to be mature and hard. Collect harvested cocoons in the trays and transport it in a separate room.
Pests & Diseases Of Silkworms
In rearing silkworms it is often said that prevention is better than cure. Because once your silkworms get infected with pathogens then it will be nearly impossible to cure them. Therefore you need to be cautious during rearing of worms.
Use bed disinfectants, practice bed cleaning, and maintain adequate temperature and humidity to avoid any kind of pests and disease infestation.
Bed Cleaning
Normally a much large quantity of mulberry leaves has to be fed than is caten by the worms. It is obvious, therefore, that a sizeable quantity of unconsumed leaves, more or less in a state unfit for food, remains over in the bed or tray at the end of each feed.
In addition to this, there are excreta which the worms are passing, and the whole forms a thick and often damp bed which ought not to be allowed to remain. The pilling of litter makes beds moist and releases processes of fermentation, thus generating injurious gases and favouring multiplication of pathogenic micro-organisms.
This imperils the health of the worms. In order to keep the silkworms healthy, the litter piled on rearing beds together with waste mulberry leaves, etc., should be periodically removed. This process is called “Bed cleaning”.
Frequency of cleaning
From the stand point of heath and sanitation of the worms, it would appear that more frequent the cleaning, the better it would be, but in practice there are important limitations. In the first place, cleaning involves labour and frequent cleaning will distort the economics of silkworm rearing.
But the more important point weighing against too frequent cleaning is the loss of worms which is an inevitable occurrence of each cleaning. Especially in the early stages, the loss of worms in cleaning tents to be very high. Having regard to the above, the following schedule of bed cleaning could be adopted profitable.
Details as follow:
I Stage: Once before moult
II Stage: Twice i.e., once just after the moult, and again before settling for II moult.
III Stage: Thrice i.e. once after moult, once in the middle of the III age and once just before settling for IV moult.
Stage IV &V Stage: Once every day in the morning after first feeding.
FAQ On Sericulture
A silkworm spin a cocoon in how many days?
Silkworm can spin a cocoon within 3 to 4 days. But you should not harvest immediately after spinning of cocoon is completed. It is because worm inside the cocoon is still in prepupal stage during this time.
Silkworms can complete cocoons in a day True or false?
False, silkworm takes 3 to 4 days to spin a cocoon.
Silkworms eat the leaves of which plant?
It totally depends on which silkworm you are talking about. Mulberry silkworms feed on mulberry leaves, Tasar silkworm feeds on oak leaves, Eri silkworm feeds on castor leaves while Muga silkworms feeds on Som or Sualu leaves.